If you haven’t played with gRPC yet you really should. gRPC is a super cool tool that gives you huge performance gains by using binary messages instead of HTTP calls. In addition, gRPC focuses on contract-first API development. gRPC uses special files called proto files which allow you to define payloads (called messages) and services that are language agnostic. This makes it much easier to communicate between services without having the overhead of complex translation layers converting HTTP or JSON around. I highly recommend you give it a shot. In this tutorial, we will take the default weather API that .NET creates for us and transform it into a gRPC application. Additionally, we will create a gRPC client which can talk to it.
Step 0: Initial Setup
Before we can start learning gRPC we first need to set up some things. First, if you want to follow this tutorial exactly be sure you have .NET 6 installed as that’s what I will be using. For instructions on how to install .NET 6 if you don’t already have it see here.
With .NET installed we’ll go ahead and create a base application that we will convert to gRPC. To do this navigate to a new folder and create a new web API project with the following command:
dotnet new webapi --name WeatherAPI
Now to confirm everything is working navigate to the new WeatherAPI directory and start the application with dotnet run. Note: If you run into an issue like “Unable to configure HTTPS endpoint” you may need to run this additional command first: dotnet dev-certs https --trust.
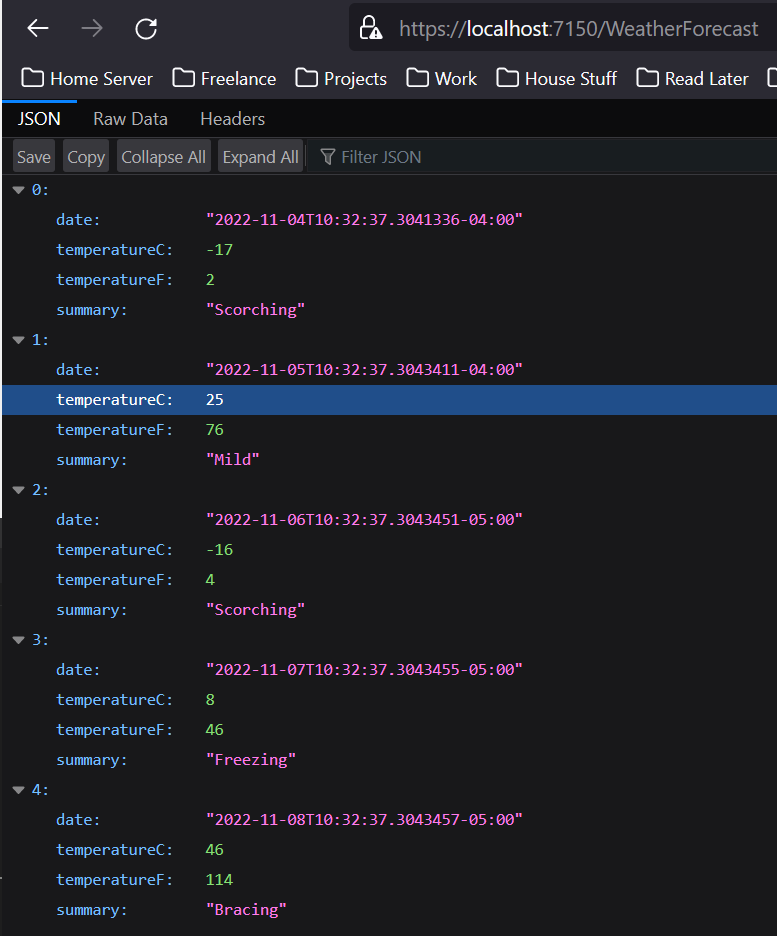
Once the app is running open a browser and navigate to the weather endpoint. Note: The base URL should be printed in the console output when you started the application. The full URL should look something like this: https://localhost:7150/WeatherForecast. You should get a result back that looks something like this:
One last optional thing you can install is the vscode vscode-proto3 plugin which will give you syntax highlighting.
Step 1: Creating the Proto File
The glue that holds all of gRPC together is proto files. These files are essentially blueprints that define what services (think HTTP controllers/routes) and messages (data objects) are used for communication. They are very straightforward and super easy to write. To start create a new folder in the WeatherAPI folder called Protos. Then, create a new file called weatherServices.proto. To being add the following content:
syntax = "proto3";

import "google/protobuf/timestamp.proto";

package weatherServices;

service WeatherService {

}
We start by defining the proto syntax. As of writing this guide, proto3 is the latest syntax for proto files so we’ll use that. Next, we pull in any imports we need (more on this later). Then, we define the package name. This will be the namespace that our generated code will be in C#. Finally, we define the bones of our new service which will contain our RPC definitions. As mentioned before this is the equivalent of a controller in a standard API.
Now let’s define our first RPC! Inside the WeatherService brackets add the following:
service WeatherService {
    rpc GetWeatherForecast (GetWeatherForecastRequest) returns (GetWeatherForecastResponse);
}
Here we are saying that our service called WeatherService will contain an RPC called GetWeatherForecast which takes an object of type GetWeatherForecastRequest as input and returns an object of type GetWeatherForecastResponse. Next, let’s define those request and response objects:
message GetWeatherForecastRequest {}
Our first message is very simple. It’s just an empty message. This is because we don’t actually need to send any data to this RPC. One thing to note is that even if you don’t have any inputs to your RPC you are required to have a request message regardless. Now let’s define our response message:
message GetWeatherForecastResponse {
    repeated WeatherForecast weatherForecast = 1;
}
Our response message is also quite simple. Here we are saying that we will have an array of WeatherForecase messages as our response. (We’ll get to what that message looks like in just a minute). The repeated keyword lets you tell gRPC that something is an array. The other thing you’ll notice is the number at the end. This is an important concept of gRPC and it tells gRPC the order of fields when they come over on the wire as a binary stream. With gRPC, you can always add fields to a message without breaking backwards compatibility so long as you don’t change the order of fields. Note: Changing a field number or removing a field is always a breaking change. In general, if you want to change field ordering or remove fields you should create a new proto file with the new spec so that you don’t break consumers.
Now let’s see some data!
message WeatherForecast {
    google.protobuf.Timestamp date = 1;
    int32 temperatureC = 2;
    string summary = 3;
}
Fields two and three are easy enough. Here we just tell gRPC the type and name and we are good to go. What about our date field though? Well, it turns out that datetime is not a standard scalar value supported by gRPC. You can see the full list of scalar types here. To get around this Google has provided some helper types which will allow us to easily use these more complex types.
Before we move on to actually implementing our service there’s one last thing I’d like to show. There is another very helpful keyword called optional. This keyword lets us specify that a field isn’t required. We’ll demonstrate this by modifying our request message to have an optional int field that allows us to specify the number of days we want to get a future forecast for. To do this modify the request message like so:
message GetWeatherForecastRequest {
    optional int32 days = 1;
}
Step 2: Implementing the Service
To begin, open your WeatherAPI.csproj file so that we can add some references. Modify your ItemGroups like so:
<ItemGroup>
  <PackageReference Include="Grpc.AspNetCore" Version="2.49.0" />
  <PackageReference Include="Swashbuckle.AspNetCore" Version="6.2.3" />
</ItemGroup>

<ItemGroup>
  <ProtoBuf Include="Protos/weatherServices.proto" GrpcServices="Server" />
</ItemGroup>
The package reference to Grpc.AspNetCore allows us to generate code from the proto files. The ProtoBuf include tells .NET that we will be implementing the weatherServices.proto file as a server. Other options are None which is used if we need access to just the message data types and nothing else, Client which gives us access to a client object which can be used to call a server that implements the proto file, or Both which lets our app be both a server and a client. For now, we’ll just leave it as a server since we are going to implement the services in this project.
Now, create a new folder called Services and add a new file called WeatherService.cs. Add the following content:
using Google.Protobuf.WellKnownTypes;
using Grpc.Core;
using WeatherServices;

namespace WeatherAPI.Services;

public class WeatherServiceImpl : WeatherService.WeatherServiceBase
{
    public override async Task<GetWeatherForecastResponse> GetWeatherForecast(GetWeatherForecastRequest request, ServerCallContext context)
    {
        throw new NotImplementedException();
    }
}
Notice how we are inheriting from a base class here. This will ensure that we implement all of the RPCs in our proto file. By adding the using for WeatherServices we also get access to the message types that we defined in our proto files. Looking at the method GetWeatherForecast we see that we are overriding a method that takes a GetWeatherForecastRequest and returns a GetWeatherForecastResponse just like we defined in our proto file! There is one additional special input paramter that you get for free which is the ServerCallContext. This gives you interesting information about the call itself and is very similar to the request context you would see in an HTTP call.
Before we continue we should build so that we can get easy to access to the auto-generated types. Simply run the dotnet build command. Note: If you are still seeing errors after you build in your service about the base class not being found see the troubleshooting step at bottom of this guide labeled “VSCode Won’t Recognize the Autogenerated Files”.
Now that we’ve got our class defined lets go ahead and implement our RPC method:
using Google.Protobuf.WellKnownTypes;
using Grpc.Core;
using WeatherServices;

namespace WeatherAPI.Services;

public class WeatherServiceImpl : WeatherService.WeatherServiceBase
{
    private static readonly string[] Summaries = new[]
    {
        "Freezing", "Bracing", "Chilly", "Cool", "Mild", "Warm", "Balmy", "Hot", "Sweltering", "Scorching"
    };

    public override async Task<GetWeatherForecastResponse> GetWeatherForecast(GetWeatherForecastRequest request, ServerCallContext context)
    {
        int daysToForecast = request.HasDays ? request.Days : 5;

        var weatherForecasts = Enumerable.Range(1, daysToForecast).Select(index => new WeatherServices.WeatherForecast
        {
            Date = Timestamp.FromDateTime(DateTime.UtcNow.AddDays(index)),
            TemperatureC = Random.Shared.Next(-20, 55),
            Summary = Summaries[Random.Shared.Next(Summaries.Length)]
        });

        GetWeatherForecastResponse response = new();
        response.WeatherForecast.AddRange(weatherForecasts);

        return response;
    }
}
As you can see the actual code of our RPC method is pretty much the same as the original with two key differences. The first is on line 20, here we are taking the datetime and converting it to a Google timestamp. Like we saw earlier proto files don’t support the DateTime type by default but we can get around that by using the Google Timestamp type instead. Additionally in order to convert it FromDateTime requires that the DateTime be in UTC. The second thing you’ll notice that’s different is that instead of just returning the list of forecasts directly we have to create the response object and then add them to the repeatable that way.
The final step we need to do before we can use our new service is setup our app to use it. To do that we will first modify our Program.cs file. Since we will no longer be using HTTP we will remove everything related to that and replace it with gRPC. Note: If you are on macOS there is some extra config you will need to do. See this article here.
using Microsoft.Extensions.DependencyInjection;
using WeatherAPI.Services;

var builder = WebApplication.CreateBuilder(args);

// Additional configuration is required to successfully run gRPC on macOS.
// For instructions on how to configure Kestrel and gRPC clients on macOS, visit https://go.microsoft.com/fwlink/?linkid=2099682

// Add services to the container.
builder.Services.AddGrpc();

var app = builder.Build();

// Map Services
app.MapGrpcService<WeatherServiceImpl>();

app.Run();
Our Program.cs now becomes much simpler than before. All we do is add gRPC to the services and then map our service implementation we just created. Finally, since we are converting a standard web API we need to make one last change to our appsettings.json file and tell it to add support for Http2:
{
  "Logging": {
    "LogLevel": {
      "Default": "Information",
      "Microsoft.AspNetCore": "Warning"
    }
  },
  "AllowedHosts": "*",
  "Kestrel": {
    "EndpointDefaults": {
      "Protocols": "Http2"
    }
  }
}
Step 3: Testing with Postman
For our initial tests we can use Postman as a gRPC client. Make sure you have Postman version 10 or later installed before continuing. Start by going to the hamburger menu in the top left and click File -> Import. Next click Choose Files and select your proto file. Make sure your service is selected and then click Import:
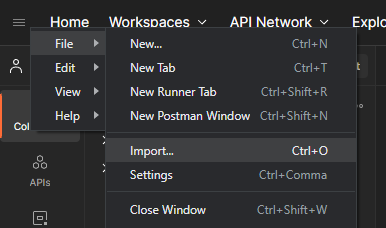
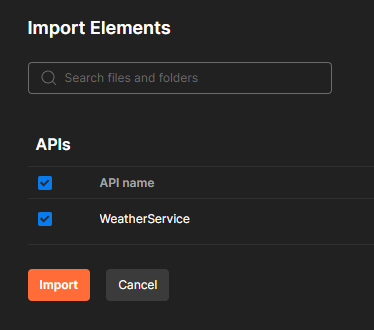
Now start your dotnet application via the dotnet run command. Note the base URL that it is listening on. Back in Postman click the hamburger menu again and this time click File -> New and select gRPC Request:
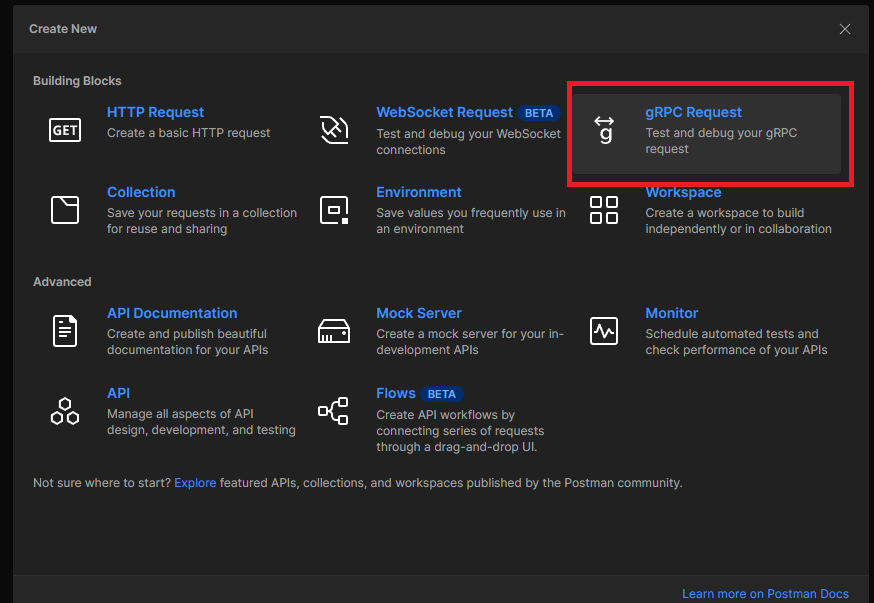
In the server URL enter the following: gRPC://<YourBaseUrlHere>. Replace <YourBaseUrlHere> with what you got from the console output (but don’t include http:// or https://). For example, my URL was: gRPC://localhost:7150. Next, we’ll select the method to call. If you click on the select method call dropdown it’ll prompt you to select the service. Select WeatherService and then select the GetWeatherForecast RPC. Now, click on Generate Example Message to get an example request payload. Finally before we invoke the RPC make sure to change the message body to something reasonable:

If everything worked we should get a response like this:
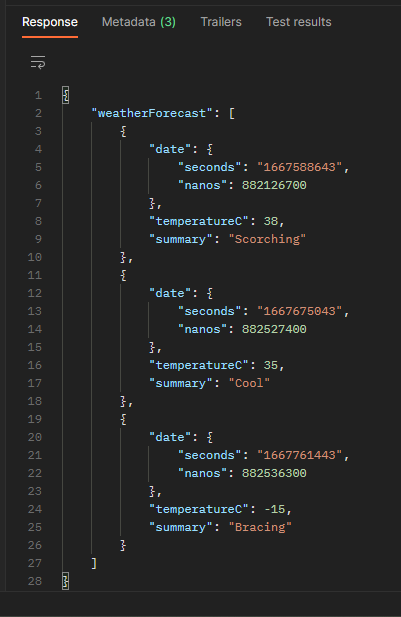
Step 4: Creating a gRPC Client
The last thing I want to go over is creating a gRPC client. For this we will create a simple console application that calls our weather forecast service to get the weather. To begin create a new dotnet application called WeatherClient: dotnet new console --name WeatherClient.
Now edit the WeatherClient.csproj to pull in the proto file as before:
<Project Sdk="Microsoft.NET.Sdk">

  <PropertyGroup>
    <OutputType>Exe</OutputType>
    <TargetFramework>net6.0</TargetFramework>
    <ImplicitUsings>enable</ImplicitUsings>
    <Nullable>enable</Nullable>
  </PropertyGroup>

  <ItemGroup>
    <PackageReference Include="Grpc.AspNetCore" Version="2.49.0" />
  </ItemGroup>

  <ItemGroup>
    <ProtoBuf Include="../WeatherAPI/Protos/weatherServices.proto" GrpcServices="Client" />
  </ItemGroup>
</Project>
Notice how this time we specify that we are a client not a server. Next, for the actual code in Program.cs:
using Grpc.Net.Client;
using WeatherServices;

Console.WriteLine("Hello, World!");

GrpcChannel channel = GrpcChannel.ForAddress("http://localhost:5287"); // Change this to whatever your service is running on
WeatherService.WeatherServiceClient weatherServiceClient = new(channel);

GetWeatherForecastResponse response = await weatherServiceClient.GetWeatherForecastAsync(new GetWeatherForecastRequest
{
    Days = 7
});

foreach (WeatherForecast forecast in response.WeatherForecast)
{
    Console.WriteLine($"Date: {forecast.Date.ToDateTime().ToLocalTime()}");
    Console.WriteLine($"Temperature C: {forecast.TemperatureC}");
    Console.WriteLine($"Summary: {forecast.Summary}");
    Console.WriteLine("--------------------------------------------------");
}
If you havn’t already go ahead and startup your service app before writing the code so that you can get the service address. Breaking down the code a bit further. We start by getting the gRPC channel. This is just the address that gRPC will use to talk to the service. Next we create the client using that service. Now we have a client that we can use to call the service as if it were any other method. We call the service get the response and then print it out to the console. The only thing to note here is that again since we are using the special Google Timestamp type we have to convert it back to a DateTime and then back to local time.
To test it make sure that the service is running and then from the console app directory type dotnet run. You should get an output that looks something like this:
Hello, World!
Date: 11/4/2022 3:28:54 PM
Temperature C: -17
Summary: Hot
--------------------------------------------------
Date: 11/5/2022 3:28:54 PM
Temperature C: 16
Summary: Scorching
--------------------------------------------------
Date: 11/6/2022 2:28:54 PM
Temperature C: 40
Summary: Sweltering
--------------------------------------------------
Date: 11/7/2022 2:28:54 PM
Temperature C: -9
Summary: Mild
--------------------------------------------------
Date: 11/8/2022 2:28:54 PM
Temperature C: 18
Summary: Hot
--------------------------------------------------
Date: 11/9/2022 2:28:54 PM
Temperature C: 13
Summary: Scorching
--------------------------------------------------
Date: 11/10/2022 2:28:54 PM
Temperature C: 49
Summary: Sweltering
--------------------------------------------------
Final Thoughts
As you can see from the client demo portion not only is gRPC blazing fast across the network but it can greatly simplify the code you write. We don’t have worry about serializing/deserialzing JSON objects. We don’t have to worry about headers or complicated HTTP calls. All you do is create an instance of the client and gRPC handles the rest. Obviously gRPC isn’t a silver bullet, nothing is, but I think that it can extremely powerful in many situations. In particular service to service calls can become extremely fast and simple. So give it shot and let me know down in the comments what you think of it or if you have any questions!
Troubleshooting
VSCode Won’t Recognize the Autogenerated Files
Sometimes even after you build the OmniSharp server that VSCode uses for C# won’t be able to recognize that code was auto generated for the proto files. You will know this is the case when you try to reference an auto-generated object (like a service base class) and VSCode still shows an error saying that it cannot be found even though your build works just fine. The first thing to check would be to make sure that you have a reference to gRPC in your .csproj file and then you also have a reference to your proto file in there as well. If those two things are good and you are still having problems you should restart the OmniSharp server.
To do this open the command pallette (ctrl + shift + p by default) and execute the command “OmniSharp: restart OmniSharp”:

Finally, if this also fails you might just need to completely restart VSCode altogether.
Call to gRPC Service Fails with 13 INTERNAL
As mentioned before gRPC requires Http2. Make sure that this is enabled in your appsettings like so (additional configuration may be required depending on how you are hosting the webapp elsewhere):
{
  "Logging": {
    "LogLevel": {
      "Default": "Information",
      "Microsoft.AspNetCore": "Warning"
    }
  },
  "AllowedHosts": "*",
  "Kestrel": {
    "EndpointDefaults": {
      "Protocols": "Http2"
    }
  }
}
Unable to start ASP.NET Core gRPC app on macOS
See this article from Microsoft on how to get up and running here.