Since 2020 I’ve been working from home. As time has passed, I’ve been in more and more meetings where I can’t be disturbed. This past weekend I realized I have this little LED sign that you can use an IR remote with to change its color. It would be really cool if I could have the sign change color based on whether or not I was in a Teams meeting. I’ve also got an Elegoo Uno (similar to the Arduino Uno) lying around that I’ve been looking for an excuse to play around with. To that end, I decided this would be the perfect opportunity to put something cool together.
The plan was simple! I will create a program for the Arduino to send/receive IR signals and then create an app that can communicate with Teams to send commands to the Arduino to change the sign’s color. Let’s take a look at how I did it.
Controlling the Sign
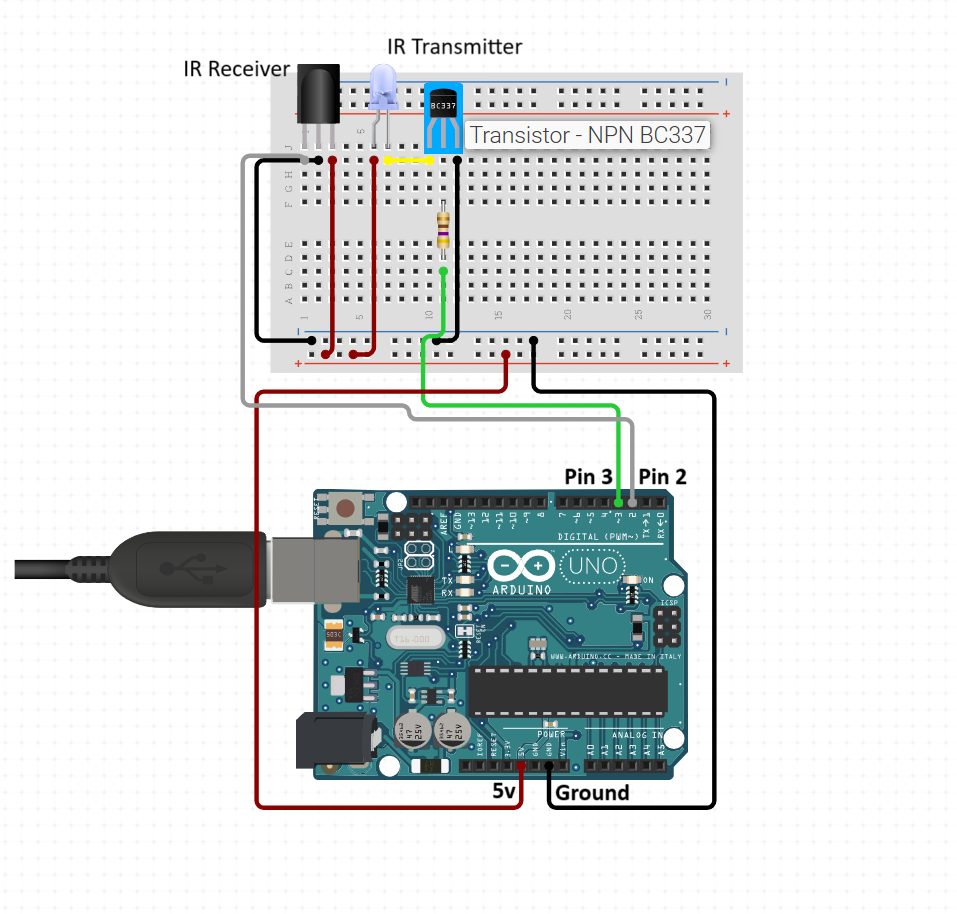
The first half of the setup involves the Arduino. It’s a pretty basic design that includes an IR transmitter, an IR receiver, and the Arduino itself. Below is a quick diagram of how I wired it up:
With the circuit setup the next step is to figure out what IR codes the remote is sending to the light to make it change. To do this we’ll write a very simple little program that takes incoming IR messages and prints them to the serial console.
First I’ll create a new Arduino project and thence create a header file called definitions.h with the following code:
#define IR_RECEIVE_PIN      2
#define IR_SEND_PIN         3
#define ENABLE_LED_FEEDBACK 1
Now in the main project file (Arduino.ino in my case) let’s add the code to receive IR messages:
#include "definitions.h"
#include <IRremote.hpp>

void setup() {
  Serial.begin(9600);

  IrReceiver.begin(IR_RECEIVE_PIN, ENABLE_LED_FEEDBACK);
  Serial.println("Ready to receive IR signals at pin " + String(IR_RECEIVE_PIN));
}


void loop() {
  // Handle serial input
  reader.poll();

  // Handle IR input
  if (IrReceiver.decode()) {
    Serial.print(F("IR command recieved: "));
    IrReceiver.printIRResultShort(&Serial);

    IrReceiver.resume(); // Enable receiving of the next value
    Serial.println();
  }
}
To make our lives easier we will use the IRremote library. Using that sending/receiving IR signals is very easy. We start by enabling the serial console and then start receiving IR on the pins we defined in our header file. Next in the main loop we simply check for incoming signals, decode them, and print them out to the serial console.
If we were to upload this and point the remote at the receiver and click the red button we would get the following output (Note: The IR codes will differ from remote to remote so you’ll need to test your own):
IR command recieved: Protocol=NEC Address=0x0 Command=0x19 Raw-Data=0xE619FF00 32 bits LSB firstWith this information, we can see the protocol, address, and command that our sign is expecting us to send to it. We’ll copy this information for each of the commands we want to copy (I copied on, off, red, green, and purple.
Next, we’ll add some more definitions to make our lives easier and then add a repeater function so that we can still use the remote if we want to. In definitions.h add the following:
#define IR_POWER_ON_HEX         0xD
#define IR_POWER_OFF_HEX        0x1F
#define IR_DEFAULT_ADDRESS_HEX  0x0
#define IR_COLOR_RED_HEX        0x19
#define IR_COLOR_GREEN_HEX      0x1B
#define IR_COLOR_PURPLE_HEX     0x4
Now back to Arduino.ino we’ll first update the setup function to enable the sender:
void setup() {
  Serial.begin(9600);

  // Start the receiver and if not 3. parameter specified, take LED_BUILTIN pin from the internal boards definition as default feedback LED
  IrReceiver.begin(IR_RECEIVE_PIN, ENABLE_LED_FEEDBACK);
  Serial.println("Ready to receive IR signals at pin " + String(IR_RECEIVE_PIN));

  IrSender.begin(ENABLE_LED_FEEDBACK);
  Serial.println("Ready to send IR signals at pin " + String(IR_SEND_PIN));
}
Finally, in our loop function, we’ll update it to repeat any IR singles with a valid protocol
void loop() {
  // Handle serial input
  reader.poll();

  // Handle IR input
  if (IrReceiver.decode()) {
    Serial.print(F("IR command recieved: "));
    IrReceiver.printIRResultShort(&Serial);

    if (IrReceiver.decodedIRData.protocol != UNKNOWN)
    {
      Serial.println(F("Forwarding..."));
      IrSender.sendNEC(IrReceiver.decodedIRData.address, IrReceiver.decodedIRData.command, 1);
    }
    else
    {
      Serial.println(F("Unknown Protocol, skipping..."));
    }

    IrReceiver.resume(); // Enable receiving of the next value
    Serial.println();
  }
}
Something important to note here is that if you don’t add the check for a valid protocol then you can end up picking up random IR noise and retransmitting it as a valid signal. I found this out after my sign would randomly switch colors throughout the day.
Now if we point the remote at the receiver and click a button the sign should change color!
The Bridge App
Now that we have a way to control our light via the Arduino, we need to control the Arduino with another program that runs on our PC. To do this we’ll use the Arduino’s serial in/out. Before we jump into the bridge app itself we need to update the Arduino code to handle serial input. We’ll start by creating an enum for the valid commands we want and then creating a serial reader:
#include "definitions.h"
#include <IRremote.hpp>
#include <serial-readline.h>

typedef enum SerialCommand {
  IR_POWER_OFF = 0,
  IR_POWER_ON = 1,
  IR_COLOR_RED = 2,
  IR_COLOR_GREEN = 3,
  IR_COLOR_PURPLE = 4
};

void received(char*);

SerialLineReader reader(Serial, received);
Now define the function received():
void received(char *line) {
  String stringLine = String(line);
  Serial.println("Serial command recieved: " + stringLine);

  switch (stringLine.toInt()) {
    case IR_POWER_OFF: IrSender.sendNEC(IR_DEFAULT_ADDRESS_HEX, IR_POWER_OFF_HEX, 1); break;
    case IR_POWER_ON: IrSender.sendNEC(IR_DEFAULT_ADDRESS_HEX, IR_POWER_ON_HEX, 1); break;
    case IR_COLOR_RED: IrSender.sendNEC(IR_DEFAULT_ADDRESS_HEX, IR_COLOR_RED_HEX, 1); break;
    case IR_COLOR_GREEN: IrSender.sendNEC(IR_DEFAULT_ADDRESS_HEX, IR_COLOR_GREEN_HEX, 1); break;
    case IR_COLOR_PURPLE: IrSender.sendNEC(IR_DEFAULT_ADDRESS_HEX, IR_COLOR_PURPLE_HEX, 1); break;
    default: break;
  }
}
Again, our code here is pretty simple. We read the serial command and based on the value we send a specific IR command. Upload this program to the Arduino and we are ready to build our bridge app.
For the bridge app, I decided to write it using .NET 8. Start by creating a new .NET 8 console app then create a new class called SerialComHandler.cs and add the following code:
using System.IO.Ports;

namespace BridgeApp;

class SerialComHandler : IDisposable
{
    private readonly SerialPort ComPort;
    private readonly Thread ReadThread;

    private bool running = true;

    public SerialComHandler(string port, int baudRate = 9600)
    {
        ReadThread = new Thread(ReadSerial);
        ComPort = new SerialPort(port, baudRate);
    }

    public void Dispose()
    {
        ComPort.Dispose();
    }

    public void Start()
    {
        running = true;
        ComPort.Open();
        ReadThread.Start();

        Console.WriteLine($"Bridge running. Serial port in open at port: {ComPort.PortName} and baud rate: {ComPort.BaudRate}");
    }

    public void Stop()
    {
        running = false;
        ReadThread.Join();
        ComPort.Close();
    }

    public void WriteSerial(string message)
    {
        ComPort.WriteLine(message);
    }

    private void ReadSerial()
    {
        while (running)
        {
            try
            {
                string message = ComPort.ReadLine();
                Console.WriteLine(message);
            }
            catch (TimeoutException) { }
        }
    }
}
For the most part, the code is pretty straightforward. We create a SerialPort and use it to read and write from it. The most important thing here is making sure that our reading takes place on a separate thread. If we don’t read on a separate thread it will block our main program from doing anything else.
Next, let’s fill out our Program.cs file:
namespace BridgeApp;

public class Program
{
    static bool running = false;
    static SerialComHandler? arduino = null;

    public async static Task Main(string[] args)
    {
        Console.WriteLine("Bridge starting up...");

        // Setup services
        ServiceCollection services = new();

        IConfiguration config = new ConfigurationBuilder()
            .AddJsonFile("appsettings.json", optional: false)
            .AddJsonFile("appsettings.Development.json", optional: true)
            .AddUserSecrets<Program>()
            .Build();
        services.AddSingleton(config);

        IServiceProvider serviceProvider = services.BuildServiceProvider();

        // Program startup
        arduino = new("COM3", 9600);
        arduino.Start();
        running = true;

        // Main program loop
        while (running)
        {
            string? userInput = Console.ReadLine();
            if (userInput == "quit")
            {
                running = false;
            }
            else if (int.TryParse(userInput, out int value))
            {
                arduino.WriteSerial(userInput);
            }
        }

        // Program shutdown
        arduino.Stop();
    }
}
Here we to some boilerplate setup for configs and services (we’ll use these later for other things like a teams integration and/or discord integration) and then create a new instance of the SerialComHandler. We call start on it which will open up the com port and allow us to read and write to the Arduino. You’ll notice the string there used to specify the COM port. This will vary from system to system. To find the correct COM port open Powershell and run the following command:
Get-WMIObject Win32_SerialPort | Select-Object Name,DeviceID,Description
You should get an output similar to this:
Name               DeviceID Description
----               -------- -----------
Arduino Uno (COM3) COM3     Arduino Uno
Use the DeviceID listed for the Arduino in place of “COM3” in the code. Next we start up our main loop where we read user input and if it’s an int we send it to the Arduino. If we run the program and enter the number 2 the sign should turn red. (The number corresponds to the enum we defined in the Arduino code).
Teams Integration
We are almost there! The only thing left now is to get our status in teams and use that to send commands to the Arduino. Well as it turns out this is where I almost had to give up. It turns out that getting your status in Teams is easy….. if you have access to the Microsoft Graph API. Unfortunately, my (and probably most) IT department has the graph API locked down. The normal way you would do this is to create an application in Azure, grant it access to graph, and then have your app sign in and use that. (You can read more about this approach here)
Since the graph API wasn’t an option for me I had to find an alternative method. As I was researching I realized that I already have a device that has some local access to Teams: My Elgato Stream Deck. So how does it communicate with Teams without the graph API? As it turns out, there is an (as far as I can tell) undocumented local web socket API you can use. A little bit of snooping via Fiddler later (to see what commands the Stream Deck was sending) and I’ve got a working solution!
Back in our bridge app, we’ll create a new file called TeamsClient.cs. This one is a little more complex than our serial integration so let’s start with the constructor and init methods:
using System.Net.WebSockets;
using System.Text;

namespace BridgeApp;

public enum TeamsStatus
{
    InMeeting,
    Presenting,
    NotInMeeting,
    Unknown
}
public class TeamsClient : IAsyncDisposable, IDisposable
{
    private readonly Thread receiveThread;
    private readonly SocketsHttpHandler handler;
    private readonly ClientWebSocket ws;
    private readonly string token;

    private TeamsStatus currentStatus = TeamsStatus.Unknown;
    private Action<TeamsStatus>? statusUpdateCallback;

    public TeamsClient()
    {
        receiveThread = new Thread(Recieve);
        handler = new SocketsHttpHandler();
        ws = new ClientWebSocket();
        token = Guid.NewGuid().ToString();
    }

    public async Task Init(Action<TeamsStatus>? statusUpdateCallback, CancellationToken cancellationToken)
    {
        this.statusUpdateCallback = statusUpdateCallback;

        Uri uri = new($"ws://localhost:8124?token={token}&protocol-version=2.0.0&manufacturer=FixeraSolutions&device=HomeBridge&app=HomeBridge&app-version=1.0.0");
        await ws.ConnectAsync(uri, new HttpMessageInvoker(handler), cancellationToken);
        receiveThread.Start();
    }
}
As before we are going to use a new thread to handle reading events from the web socket interface without blocking our main thread. In the init function, we save the method that will be called when the status changes and we use the web socket client to connect to the Teams WebSocket API and then start receiving messages. The URI for the WebSocket API is important. It’s broken up into the following parameters:
- Token: This seems to be something used to uniquely identify your app when it connects but also seemed to be optional sometimes. I included it as a random GUID just to be safe.
- Protocol: This is the API version. Originally I found this document that described the v1 API but that appears to have been deprecated and did not work for me.
- Manufacturer: Doesn’t seem to actually matter what the value is but it is required.
- Device: Doesn’t seem to actually matter what the value is but it is required.
- App: Doesn’t seem to actually matter what the value is but it is required.
- App-Version: Doesn’t seem to actually matter what the value is but it is required.
Next lets define our Recieve method:
private async void Recieve()
    {
        while (ws.State == WebSocketState.Open)
        {
            WebSocketReceiveResult result;
            ArraySegment<byte> buffer = WebSocket.CreateClientBuffer(1024, 1024);

            using MemoryStream stream = new();
            do
            {
                result = await ws.ReceiveAsync(buffer, new CancellationToken());
                stream.Write(buffer.Array, buffer.Offset, result.Count);
            } while (!result.EndOfMessage);

            stream.Seek(0, SeekOrigin.Begin);

            if (result.MessageType == WebSocketMessageType.Text)
            {
                using var reader = new StreamReader(stream, Encoding.UTF8);
                string text = await reader.ReadToEndAsync();

                SetStatusFromMessage(text);
                statusUpdateCallback?.Invoke(currentStatus);
            }
        }
    }

private void SetStatusFromMessage(string message)
    {
        if (message.Contains("meetingUpdate"))
        {
            if (message.Contains("canStopSharing\":true"))
            {
                currentStatus = TeamsStatus.Presenting;
            }
            else if (message.Contains("canLeave\":true"))
            {
                currentStatus = TeamsStatus.InMeeting;
            }
            else
            {
                currentStatus = TeamsStatus.NotInMeeting;
            }
        }
        else
        {
            Console.WriteLine("Message was not a status update, skipping.");
        }
    }
Here we read the incoming byte stream, convert it to a string, and then invoke the callback for when the status changes.
Now to use it we’ll create a static bool for if we are in a Teams meeting or not:
static bool inTeamsMeeting = false;
Now we’ll write our callback handler:
static void OnTeamsStatusUpdated(TeamsStatus status)
    {
        switch (status)
        {
            case TeamsStatus.InMeeting:
            case TeamsStatus.Presenting:
                inTeamsMeeting = true;
                break;
            case TeamsStatus.Unknown:
            case TeamsStatus.NotInMeeting:
            default:
                inTeamsMeeting = false;
                break;
        }

        UpdateLight();
    }
And the update light method:
static void UpdateLight()
    {
        if (arduino == null)
        {
            Console.WriteLine("Arduino has not be initialized!");
            return;
        }

        arduino.WriteSerial(((int)LightCode.On).ToString());

        if (inTeamsMeeting)
        {
            arduino.WriteSerial(((int)LightCode.Red).ToString());
        }
        else
        {
            arduino.WriteSerial(((int)LightCode.Green).ToString());
        }
    }
Now the last step is to update our main method to create an instance of the teams client and start it:
arduino = new("COM3", 9600);
arduino.Start();
running = true;

var teamsClient = serviceProvider.GetRequiredService<TeamsClient>();
await teamsClient.Init(OnTeamsStatusUpdated, new CancellationToken());
And now we are done! To test it out you can do a test call in Teams settings and you should see the sign update its color to red and then back to green when you leave the call!
Final Thoughts
This was a really fun/unique project to work on and hopefully, you can use it to make something of your own! In the code repo (found here), I will also include my Discord integration that I wrote as part of this project as well. That one works very well but requires you to be able to add a bot the server you are in. As always let me know if you have any questions down in the comments. Until next time, happy coding!
