In Part 1 of my series on authentication and authorization, I went over how to create a secure basic front-end application behind a login screen. In today’s post, we’ll take it a step further and introduce and backend component. Since backends to applications are often stateless, the process to allow access is somewhat different and relies on something called an access token. These access tokens given to us by our auth server will allow us to prove our identity to a backend server and hit secured routes. So let’s jump into it!
Step 0: Initial Setup
Before we begin, be sure to either follow the steps in my Part 1 blog post or just grab the final result from my Github here. Now that we have the frontend we need to create our backend. If you haven’t already, clone my Github repo for this project and open the following folder: HowTo -> Auth -> OAuth2_OpenIDConnect -> Part 2 -> StarterAppBackend. Run npm install and then npm run dev to start the app. The starter app is made up of two routes. The first route is /health. This route will be an anonymous route (anyone can call it with or without authentication) and the second route /secure-route will be a protected route that just returns some text. Finally, any route besides those two will return 404 not found.
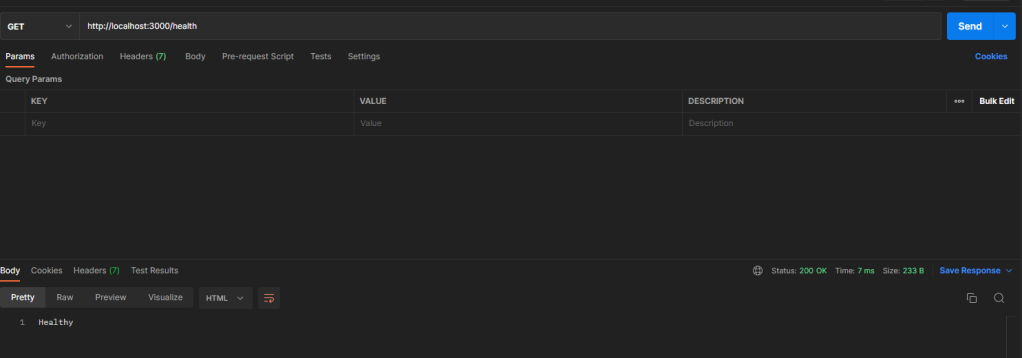
To test this out you will need a tool to call the API. I will use Postman for this demo. Open postman and in the URL enter http://localhost:3000/health and click send. We should get the text “Healthy” back.
Similarly, we can call the secure route:
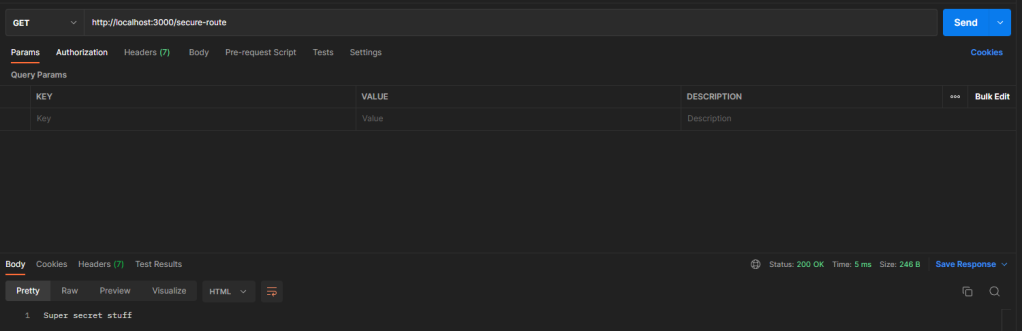
We can see that we can hit both routes now without any authentication. Let’s fix that!
Step 1: Auth Middleware
Before we begin I should mention that what I’m about to show should NEVER be done from scratch in a production scenario. Always use a prebuilt library (for example jsonwebtoken) to validate your tokens. What I am showing here is for you to learn the end-to-end process of how OIDC and Oauth 2.0 work. This is by no means a complete solution so use it at your own risk. With that disclaimer out of the way, let’s begin.
Start by installing the axios package: npm install axios. Now create a new file under src called authMiddleware.js with the following contents:
export default (req, res, next) => {
  return next()
}
Now in routes.js import the new module and then update the secure route to use it:
import authMiddleware from './authMiddleware.js'
router.get('/secure-route', authMiddleware, (req, res) => {
  res.send('Super secret stuff')
})
This tells the route to call our middleware function before continuing which will allow us to do our authentication. Right now our middleware just passes on without checking anything so nothing should change just yet. The first thing we should check in our auth middleware is to see if the header of the request contains a token or not. Back in our middleware change the function to include the following code:
export default (req, res, next) => {
  const authHeader = req.headers.authorization
  const token = authHeader && authHeader.includes('Bearer ') ? authHeader.split('Bearer ')[1] : null

  if (!token) {
    return res.status(401).send('Unauthorized');
  }

  return next()
}
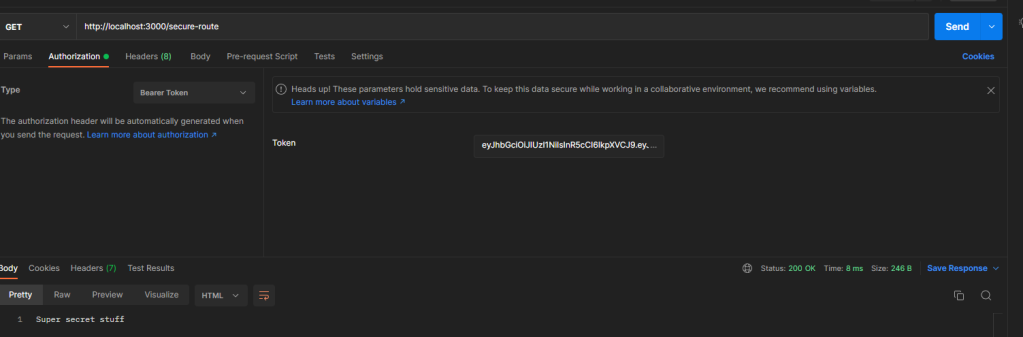
Now if we send our request for /secure-route we should receive the text “Not Authorized”. To make things work, in Postman go to the authorization tab, select Bearer Token as the type and then paste the following fake token into the token field: eyJhbGciOiJIUzI1NiIsInR5cCI6IkpXVCJ9.eyJzdWIiOiIxMjM0NTY3ODkwIiwibmFtZSI6IkpvaG4gRG9lIiwiaWF0IjoxNTE2MjM5MDIyfQ.SflKxwRJSMeKKF2QT4fwpMeJf36POk6yJV_adQssw5c
Now if we call our route we should get our secure text back!
Breaking down what are code does so far, we first grab the auth header, then we try and get the token if it exists. If the user doesn’t have a valid token we exit immediately with a 401 otherwise we let the user through. Now that we’ve ensured the user has a token we need to actually validate that the token is real.
A JWT token is made up of 3 parts: The header, the body, and the signature. So let’s verify that all 3 parts are there:
const tokenParts = token.split('.')

if (tokenParts.length !== 3) {
  console.warn('Invalid token.')
  return res.status(401).send('Unauthorized')
}
Each part individually is base64 encoded so lets decode them:
try {
  const tokenHeader = JSON.parse(Buffer.from(tokenParts[0], 'base64url'))
  const tokenBody = JSON.parse(Buffer.from(tokenParts[1], 'base64url'))
  const tokenSignature = Buffer.from(tokenParts[2], 'base64url').toString()

} catch {
  console.warn('Invalid token.')
  return res.status(401).send('Unauthorized')
}
If you were to console.log() each of those variables and send another request you would get an output something like this:
Header: { alg: 'HS256', typ: 'JWT' }
Body: { sub: '1234567890', name: 'John Doe', iat: 1516239022 }
Signature: I�J�♦IHNJ(]�O��lj~�:N�%_�u
The header contains information about the JWT such as what algorithm was used to sign it, what is the key id (notice our fake token is missing the kid), etc. The body contains the actual data like the subject aka who is this token about, iat aka when was this token issued, etc. The last part looks like a bunch of gibberish but this is the signature that we need to validate in order to prove that the token has not been tampered with. This is the first and most important thing we should validate. If we can’t validate the signature then the rest of the token is garbage and can’t be trusted for anything.
Step 3: Setup Postman to Get a Valid Token
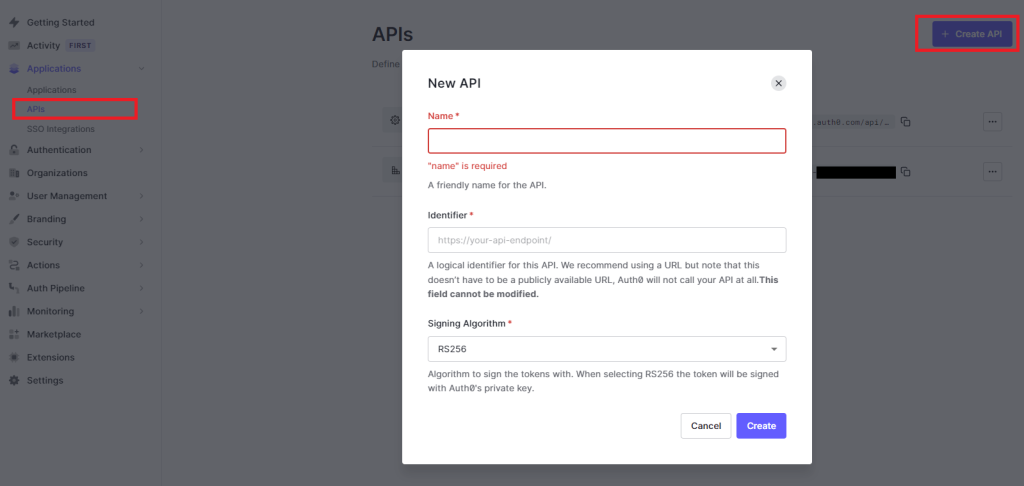
Before we write the code to verify the signature let’s update postman so that we can get a real token from our auth provider. First, create an API in auth0 that we will use for our audience. Navigate to Applications -> APIs and click Create API. Give it any name, an identifier (you will use the identifier as the audience for the next part), and select RS256 as the signing algorithm.
Now, In postman go back to the authorization tab and change the type to OAuth 2.0. Fill out the following settings:
- Token Name – Whatever you want (I used DemoToken)
- Grant Type – Authorization Code (With PKCE)
- Authorize using browser – Leave unchecked
- Auth URL – This is the /authorize URL for your auth server. (If you recall from Part 1 you can get this from the .wellknown endpoint). For Auth0 it will be something like https://<your-tenant-name>.us.auth0.com/authorize?audience=<your-audience>
- Access Token URL – Similar to above you can get it fromt he well known endpoint or build it based on this: https://<your-tenant-name>.us.auth0.com/oauth/token
- Client ID – The client id of the application you used to authenticate in Part 1.
- Code Challenge Method – SHA-256
- Scope – openid profile email
- State – Anything (in my case I used the word “something”)
- Client Authentication – Send as Basic Auth header

All of these settings should look at least somewhat familiar to you. This is because Postman is going to go through the same login flow that we built from scratch in Part 1. Go ahead and click “Get New Access Token” and sign in and then click “Use Token”. This will set the token we got back as the token to use for requests.
Step 4: Validate Token Signature
Now that we can get a legitimate token we need to verify the token signature. This is probably the most important part of token verification. If the signature can’t be verified then the token could be modified and cannot be trusted. Depending on how the token was issued there are a couple of ways we can verify the signature. For example, if it was our backend that issued the token then we would have a secret that we can use to verify the token signature. In our case, however, we don’t have the secret that was used to sign the token so we’ll need to rely on something else. To begin we need to get the openID config so that we can find the key information.
Start by installing axios: npm install axios. Next, create a new file called config.js:
export default {
  domain: '<your-domain>.us.auth0.com'
}
Now we import it into our authMiddleware.js and use it to get the openID configuration (Also change the function to be async):
import config from './config.js'
import axios from 'axios'

let openidConfig

export default async (req, res, next) => {
...
Now inside of our try-catch block:
try {
  const tokenHeader = JSON.parse(Buffer.from(tokenParts[0], 'base64url'))
  const tokenBody = JSON.parse(Buffer.from(tokenParts[1], 'base64url'))
  const tokenSignature = Buffer.from(tokenParts[2], 'base64url').toString()

  if (!openidConfig) {
    const configResponse = await axios.get(`https://${config.domain}/.well-known/openid-configuration`)
    openidConfig = configResponse.data
  }
}
Once we have our openID config we can find the route which contains the key information:
const keyInfoResponse = await axios.get(openidConfig.jwks_uri)
const keyInfo = keyInfoResponse.data
Now that we have the key information we can use it to verify the token. We start by looking up the key that was used to sign the token. We lookup the key by a field on the token called the “kid” aka the key id. This field lives in the token header and should match one of the keys in the key info that we just got back:
const keys = keyInfo.keys.filter(k => k.kid === 'tokenHeader.kid')
if (keys.length === 0) {
  console.warn('Key not found.')
  return res.status(401).send('Unauthorized')
}
const signingKey = keys[0]
We now have all the info we need to verify the signature of our token. We could go through the process of building the public key in PEM format from scratch but to make things a bit easier we’ll install another library: npm install rsa-pem-from-mod-exp. If you would like to see the specifics of what it’s doing you can check out its GitHub here. Import it at the top of our middleware and then we’ll use it to get the public key and then use that to verify our token:
import getPem from 'rsa-pem-from-mod-exp'
import crypto from 'crypto'
const signingKey = keys[0]
const publicKey = getPem(signingKey.n, signingKey.e)

const verifier = crypto.createVerify('RSA-SHA256')
verifier.update(`${tokenParts[0]}.${tokenParts[1]}`)
let isValid = verifier.verify(publicKey, tokenSignature)

if (!isValid) {
  console.warn('Signature validation failed.')
  return res.status(401).send('Unauthorized')
}
Note: As mentioned earlier this is NOT a complete solution. The above code will only validate a token that was signed with RSA-SHA256. For a more complete solution use an actual token library. I have included an example in my GitHub.
Step 4: Validate the Token Claims
Once the signature is verified and we know that we can trust the claims the last step is to verify that a couple of the claims match what expect and then pass the claims on to the rest of the API so that it can get info about the user. You could verify lots of different token claims but for the purposes of the demo we’ll verify the following claims:
- iss – Issuer aka who created the token
- aud – Audience aka who is the token intended for
- exp – Expiration aka when does the token expire
Verifying the expiration:
const currentTime = Date.now() / 1000
if (currentTime > tokenBody.exp) {
  console.warn('Token is expired.')
  return res.status(401).send('Unauthorized')
}
Verifying the issuer & audience (Don’t forget to update config.js):
if (!tokenBody.aud.includes(config.audience)) {
  console.warn('Invalid audience.')
  return res.status(401).send('Unauthorized')
}

if (config.issuer !== tokenBody.iss) {
  console.warn('Invalid issuer.')
  return res.status(401).send('Unauthorized')
}
Last but not least set the request user to the token body so that we have access to it later on in the API pipeline:
req.user = tokenBody
And that’s it! We have successfully secured our API!
Final Thoughts
Today we went over how to set up a backend API that has routes that require an authenticated user. The important part here is that once we verify the signature of a token we can safely use the claims on the token to know things about the user. For example, a token could include a user’s roles which we could use in a route to determine what they are allowed to do in some route. In order to prove that the user has those roles we first have to verify that the token is legitimate. This is the authentication process. In our final part of this series, I’ll go over combining the UI and the API together as well as looking at some additional claims to create an admin-specific route. As always if you have any questions or comments let me know in the comments. I hope this was helpful!
