Authentication and authorization are one of the most critical pieces of a web application. Getting them wrong can be catastrophic and getting them right can be confusing if you aren’t familiar with how they all work. In this new multi-part series I’m going to go over everything you need to know about setting all of this up. In this first post, I’ll go over creating a basic frontend application that allows users to signup and login.
For the purposes of this series, I’ll be using the auth provider Auth0 but I’ll be writing the code using OAuth 2.0 and OpenID Connect standards, not the Auth0 wrapper libraries so that you can take this code and apply it to any auth provider of your choice.
Note: I will not be going over how to create your own auth provider and it’s generally recommended that you don’t roll your own unless you really know what you are doing. As of writing this post Auth0 still has a free tier that you can use to follow along.
Step 0: Initial Setup
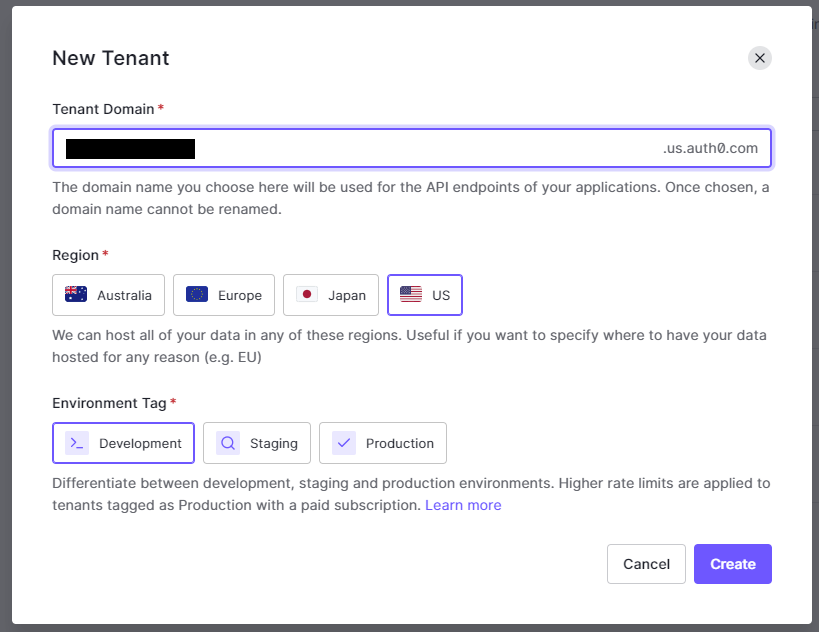
Before we jump into setting everything up we first need to do some Auth0 setup. This will be the same setup that we did in one of my previous posts on CI/CD with Auth0. To start, go to Auth0.com and log in or sign up for an account. From there we’ll create a new tenant. Give it a unique name, select the region that best meets your needs, and select development for the environment tag:
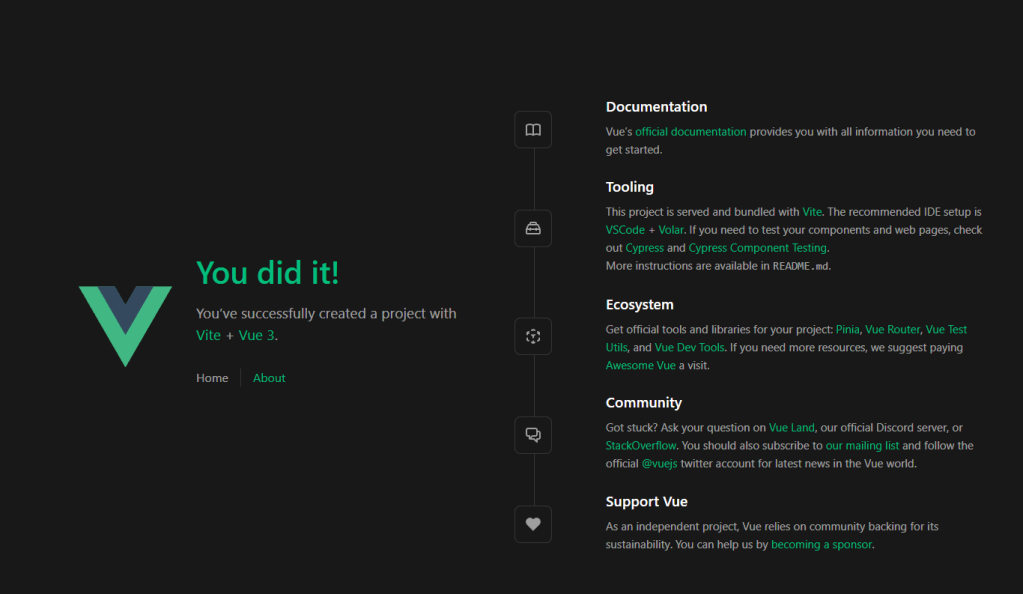
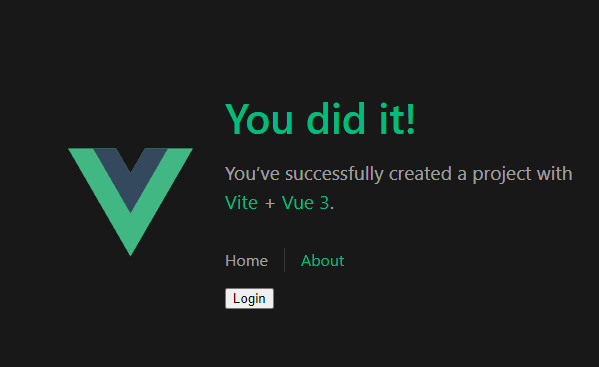
Now that we’ve got auth0 ready let’s go ahead and set up our demo application. To do this you can clone my example app code here. I put most of my demo projects in here so don’t worry about all the extra stuff. Once you have cloned the code navigate to the folder Auth->OAuth2_OpenIDConnect->Part1->StarterAppFrontend and run npm install (Note: This project uses Node v16.13). Once that’s done run npm run dev to start the app. Navigating in a web browser to http://localhost:3000 should present you with the following screen:
Step 1: Auth Basics
Now that we’ve got our setup out of the way we can move on the actually securing our app. For this tutorial, we’ll lock the about page behind a simple login screen. Let’s first talk about some terminology.
Both OAuth 2.0 and OpenID Connect are standards used for authentication and authorization. Specifically, the main difference between the two per Okta is: “OAuth 2.0 is a framework that controls authorization to a protected resource such as an application or a set of files, while OpenID Connect and SAML are both industry standards for federated authentication.” In other words: OAuth 2.0 is a more generalized framework for authorization that allows applications to take actions or access resources from a server on behalf of a user. OpenID Connect on the other hand is a standard that is built on top of OAuth 2.0 and also includes authenticating users. It also standardizes the use of JSON Web Tokens (JWT) for areas that OAuth 2.0 leaves up to choice.
I should probably stop here and clarify there is a big difference between Authentication (AuthN) and Authorization (AuthZ). Authentication helps applications answer the question “Who is this person or thing?” While Authorization helps applications answer “What can they do?”. They might seem the same but the focus of each is quite different.
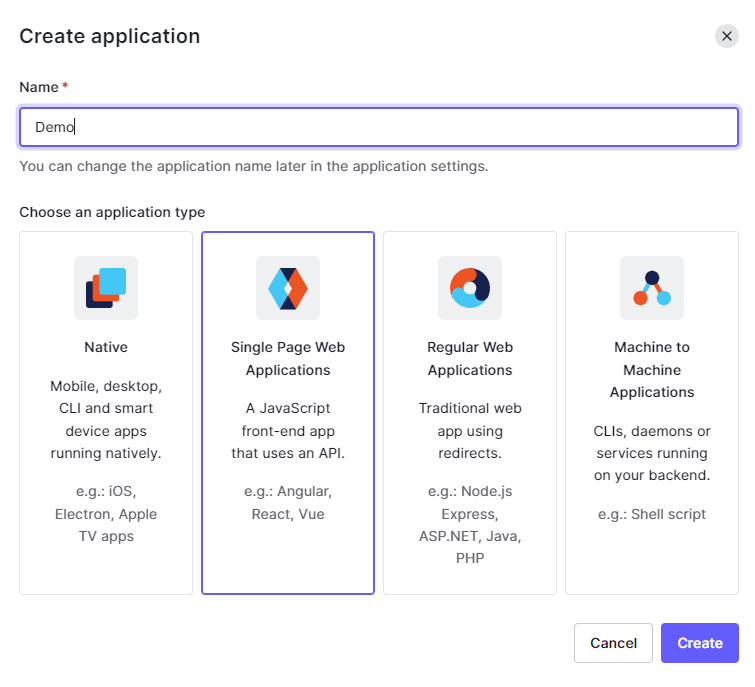
With all of that out of the way, we can start looking at what we need to do in our application. To start we’ll go back into Auth0 and create our very first application. Another name for this that you might see would be a client. This is the thing that our Vue app will actually authenticate against. To do this go into auth0 click on “applications” and then “Create Application”:

Next, select “Single Page Web Applications”, give it a name, and click “Create”:
Once you have done that, go to the settings tab and make note of the domain and client id as we’ll need this to complete the next step:
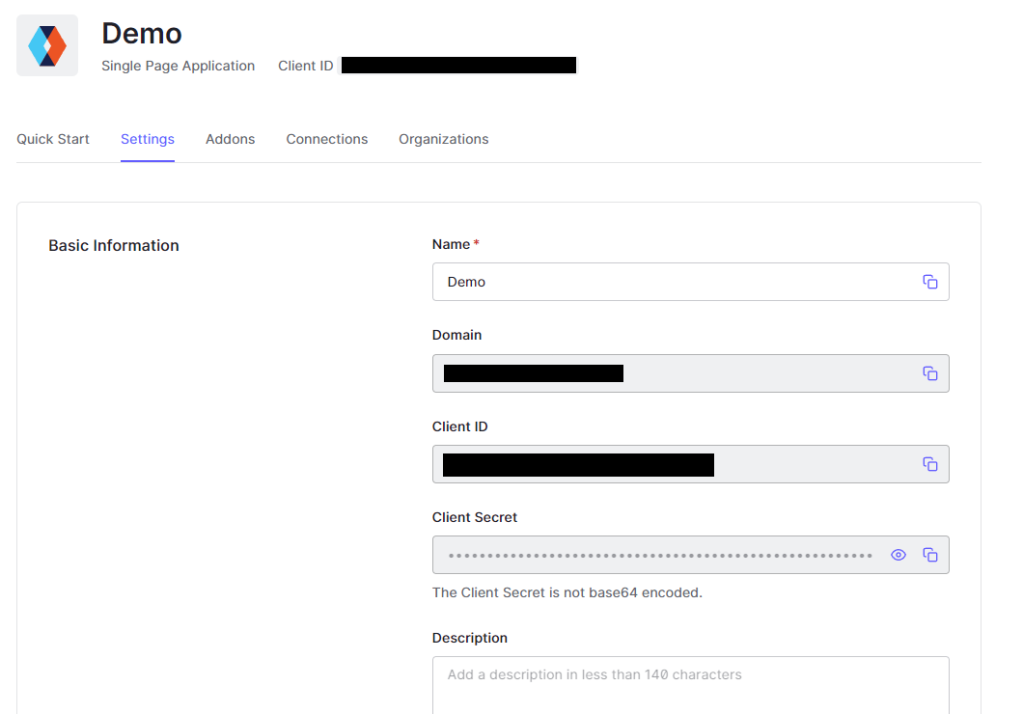
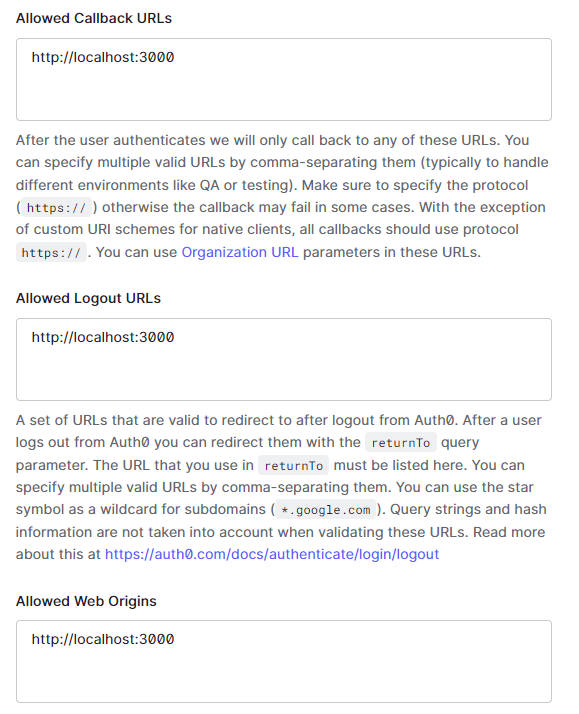
Finally, add http://localhost:3000 to the following sections: Allowed Callback URLs, Allowed Logout URLs, Allowed Web Origins, and Allowed Origins (CORS). Now at the bottom click “Save Changes”. Auth0 locks down what apps are allowed to authenticate with these.
Step 2: Preparing the Vue App
Now that we’ve set up the application in Auth0, the next step is to use it to authenticate our users. To begin, we’ll create a new Vue plugin. Create a new folder under src called auth and then make a new file called index.js with the following contents:
import AuthenticationModule from './authenticationModule';
import config from './config'
import { reactive } from 'vue'

let instance

export const getInstance = () => instance;

const useAuthPlugin = () => {
  if (!instance) {
    // We use the reactive() method here so that Vue can watch the properties of our auth module
    instance = reactive(new AuthenticationModule())
  }

  return instance
}

export default {
  install: (app, options) => {
    app.provide('auth', useAuthPlugin())
  }
}
This bit of code will allow us to use $auth in our Vue app to do various things like call login etc. The reactive method call is used so that Vue can see when properties we add later change. We also set it up so that we can get an instance of the auth module in other places (such as vue-router for guarding certain routes as we’ll see later). Next, modify main.js to use our plugin like so:
import { createApp } from 'vue'
import App from './App.vue'
import router from './router'
import auth from './auth'

const app = createApp(App)

app.use(router)
app.use(auth)

app.mount('#app')
Finally, we create the shell of the actual authentication module. Create another file under the auth folder called authenticationModule.js with the following content:
export default class AuthenticationModule {
  constructor() {

  }
}
Step 3: Basic Authentication Logic
Most of what I’m going to show you next can be more easily taken care of by using existing libraries such as the generic openid-client or Auth0’s auth0-spa-js. In order to fully understand how these standards work, however, we are going to go step by step from scratch using Axios. So let’s start by installing Axios! If the app is running go ahead and stop it and then run the following command to install Axios: npm install axios. Next, create a config file under the auth folder called config.js and add the following code to it:
export default {
  domain: '<your auth0 domain here>',
  clientId: '<your auth0 apllication client id here>'
}
Replace the text with the actual values you saved from earlier. Next, we’ll modify our index.js in the auth folder to use the config:
import config from './config'
const useAuthPlugin = () => {
  if (!instance) {
    // We use the reactive() method here so that Vue can watch the properties of our auth module
    instance = reactive(new AuthenticationModule(config.domain, config.clientId))
  }

  instance.init() // Firing off an async method to start getting stuff ready

  return instance
}
Now let’s update the authentication module:
import axios from 'axios'

export default class AuthenticationModule {
  loading = true
  isAuthenticated = false

  constructor(domain, clientId) {
    this.domain = domain
    this.clientId = clientId
  }

  async init() {
    // Get the openid configuration details
    const configResponse = await axios.get(`https://${this.domain}/.well-known/openid-configuration`)
    this.openidConfig = configResponse.data

    this.loading = false
  }

  async login() {

  }

  async logout() {

  }
}
Part of the opened spec is a URL that lets us know how the auth provider is set up. In order to authenticate we will need this information so we make an Axios call to pull that information in. The resulting response from our auth endpoint should be something like this:
{
    "issuer": "https://yourdomain.us.auth0.com/",
    "authorization_endpoint": "https://yourdomain.us.auth0.com/authorize",
    "token_endpoint": "https://yourdomain.us.auth0.com/oauth/token",
    "device_authorization_endpoint": "https://yourdomain.us.auth0.com/oauth/device/code",
    "userinfo_endpoint": "https://yourdomain.us.auth0.com/userinfo",
    "mfa_challenge_endpoint": "https://yourdomain.us.auth0.com/mfa/challenge",
    "jwks_uri": "https://yourdomain.us.auth0.com/.well-known/jwks.json",
    "registration_endpoint": "https://yourdomain.us.auth0.com/oidc/register",
    "revocation_endpoint": "https://yourdomain.us.auth0.com/oauth/revoke",
    "scopes_supported": [
        "openid",
        ...
        "address"
    ],
    "response_types_supported": [
        "code",
        ...
        "code token id_token"
    ],
    "code_challenge_methods_supported": [
        "S256",
        "plain"
    ],
    "response_modes_supported": [
        "query",
        "fragment",
        "form_post"
    ],
    "subject_types_supported": [
        "public"
    ],
    "id_token_signing_alg_values_supported": [
        "HS256",
        "RS256"
    ],
    "token_endpoint_auth_methods_supported": [
        "client_secret_basic",
        "client_secret_post"
    ],
    "claims_supported": [
        "aud",
        ...
        "sub"
    ],
    "request_uri_parameter_supported": false
}
We can use this information to set up the login! So back in our authenticationModule.js add the following code to our login method:
async login() {
    const loginUrl = new URL(this.openidConfig.authorization_endpoint)
    loginUrl.searchParams.append('client_id', this.clientId)
    loginUrl.searchParams.append('redirect_uri', window.location.origin)
    loginUrl.searchParams.append('response_type', 'code')
    loginUrl.searchParams.append('scope', 'openid')

    window.location.href = loginUrl.href
  }
All we are really doing here is redirecting the user to our auth provider’s authentication endpoint (which was given to use by the openid config call). We need to pass a few extra parameters per the specs such as the client id that we got earlier. We also pass in the redirect URL that our auth provider should send us after we are done logging in (Note: This URL MUST match a value that was set in Auth0). The last two parameters are response type which tells auth0 the type of authentication flow we want to use (in our case code flow which I’ll go over later) and then scope which is important for token claims (which I’ll also go over later).
Now that we’ve done that, let’s add a login button to our application. Go to App.vue and modify the following lines:
<template>
  <header v-if="!loading">
    <img alt="Vue logo" class="logo" src="@/assets/logo.svg" width="125" height="125" />

    <div class="wrapper">
      <HelloWorld msg="You did it!" />

      <nav>
        <RouterLink to="/">Home</RouterLink>
        <RouterLink to="/about">About</RouterLink>
      </nav>
      <button type="button" @click="login">Login</button>
    </div>
  </header>

  <RouterView v-if="!loading" />
</template>

<script setup>
import { computed, inject, onMounted } from 'vue'
import { RouterLink, RouterView } from 'vue-router'
import HelloWorld from '@/components/HelloWorld.vue'

const auth = inject('auth') // Pulling in the auth plugin

const loading = computed(() => {
  return auth.loading
})

const login = async () => {
  await auth.login()
}
</script>
We start by making the header and router wait to render until our auth plugin is done loading. After that add our login button and create a method called login which simply calls the login method in our auth plugin.
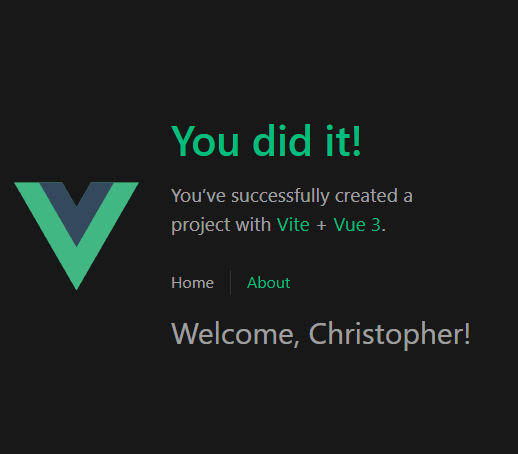
Our app should now look something like this:
Clicking on the login button should send us to Auth0 where we can sign in and create an account. Let’s go ahead and try it out now!
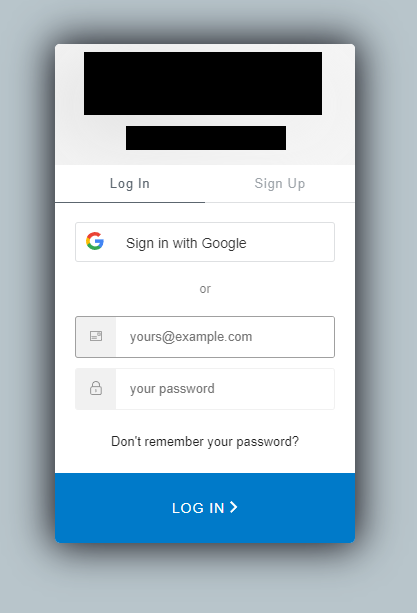
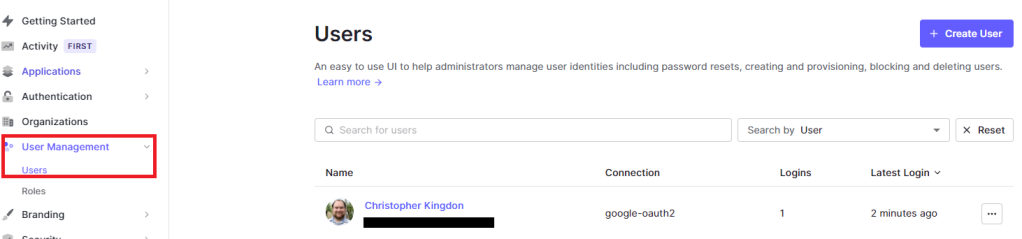
After you log in or sign up you should get redirected back to the Vue app. In my case, I used my google account to log in (you might not have this configured yet). If you go into auth0 again and go to the user management tab you should be able to see your newly created user!
Step 4: Getting a Token
Now that’s great and all but you may have noticed that nothing has actually changed in our application. The next step we need to do is to get a token.
If you look carefully you may have noticed an extra query parameter in our URL when we were redirected back from Auth0. It should look something like this: http://localhost:3000/?code=sk7FCZqBPS231OPY. This is a special code that we can use to get an id token, an access token, and depending on our setup a refresh token. These special tokens are what allow us to know information about the user that just logged in. To get started we need to install a couple of helper libraries: npm install nanoid crypto-js. Next, modify our login method to add some additional parameters:
async login() {
    const codeVerifier = nanoid(64)
    sessionStorage.setItem(codeVerifierName, codeVerifier) // Save the code verifier for when we come back from the login

    const codeChallenge = cryptojs.enc.Base64url.stringify(cryptojs.SHA256(codeVerifier))

    const loginUrl = new URL(this.openidConfig.authorization_endpoint)
    loginUrl.searchParams.append('client_id', this.clientId)
    loginUrl.searchParams.append('redirect_uri', window.location.origin)
    loginUrl.searchParams.append('response_type', 'code')
    loginUrl.searchParams.append('scope', 'openid')
    loginUrl.searchParams.append('code_challenge', codeChallenge)
    loginUrl.searchParams.append('code_challenge_method', 'S256')

    window.location.href = loginUrl.href
  }
What we are doing here is adding some special logic that will help secure our application even further. One of the main risks of a single-page application such as this one is that someone could steal the code and exchange it for a token stealing our session. In order to prevent that we generate a code verifier, hash it, and send it to auth0. Later when we exchange the code for a token we will again send the code verifier and this exchange will let Auth0 know it was us who is requesting a token.
So now we need to modify our init method to support exchanging the code for a token:
async init() {
    // Get the openid configuration details
    const configResponse = await axios.get(`https://${this.domain}/.well-known/openid-configuration`)
    this.openidConfig = configResponse.data

    const urlParams = new URLSearchParams(window.location.search)
    if (urlParams.has('code')) {
      const code = urlParams.get('code')

      const tokenRequestOptions = {
        method: 'POST',
        url: this.openidConfig.token_endpoint,
        headers: { 'content-type': 'application/json'},
        data: {
          grant_type: 'authorization_code',
          client_id: this.clientId,
          code_verifier: sessionStorage.getItem(codeVerifierName),
          code,
          redirect_uri: window.location.origin
        }
      }
      const tokenResponse = await axios.request(tokenRequestOptions)

      console.log(tokenResponse.data)
    }

    this.loading = false
  }
Breaking down this code, we check the URL to see if has a code, if it has a code then we grab the codeVerifier from session storage and make a request to the token endpoint of our auth provider (This endpoint of course comes from the openid config), finally, we print out the token response we get back so that we can take a look at it. If everything has gone smoothly you should see a token printed out in your console. There are two types of tokens you should get back: an id token which we can use to get some info about our user and an access token that we can use to talk to an API. I’ll go over the access token in a future post but for now, copy the value of the id token and head over to the website jwt.io and paste your id token in there. You should see something like this:
{
  "alg": "RS256",
  "typ": "JWT",
  "kid": "yKlynOq2qe3ShxPRjUlWt"
}
{
  "https://domain.com/roles": [],
  "iss": "https://domain.us.auth0.com/",
  "sub": "google-oauth2|583617359415889637526",
  "aud": "atnjnqKn4DtcUobadRRW0NegG2o3bTsx",
  "iat": 1649791206,
  "exp": 1649827206
}
This is what is known as a JSON Web Token or JWT. There are 3 parts to a JWT. The header comes first and tells us some metadata about the token such as how it was signed etc. Next, we have the payload. This is the meat of the token and contains various information about who the user is. Each field in this section is what is called a claim. There are a set of standard claims such as:
- iss – The token issuer aka who created this token
- sub – The id of the user
- aud – The token audience aka what is this token for. (in my case it’s for the application and should match our application ID in auth0)
- iat – Issued at aka when was the token issued
- exp – Expiration aka when does this token expire
Additionally, tokens can contain any number of custom claims. For example this token as the custom claim: https://domain.com/roles which contains any roles that our user may have.
The last part of a JWT is the signature. This portion of the JWT proves that the JWT has not changed since it was created by the auth provider. The only way to change the contents of a JWT is with the signing key. As we’ll see in a future post when we use the JWT for access to our API this signature is what lets us trust the JWT.
Step 5: Persist the Login
Now that we have a token we need to save it so that we can stay logged in. Let’s also add a couple more scopes to our auth request so that we can display a welcome message. First, modify the init method to save our tokens and set the user as authenticated:
const tokenResponse = await axios.request(tokenRequestOptions)
const idToken = tokenResponse.data.id_token
const accessToken = tokenResponse.data.access_token

this.idToken = idToken
this.accessToken = accessToken
this.isAuthenticated = true
Now modify our login code to include two additional scopes:
loginUrl.searchParams.append('scope', 'openid profile email')
From Auth0: “Scopes define the specific actions applications can be allowed to do on a user’s behalf”. In other words, by including these two scopes we are saying that our application can get the user’s profile and email on behalf of the user. This makes more sense when you think about social logins. By including a scope we are asking to be allowed to get the user’s profile and email information from Google. If login again and put the id token in jwt.io we’ll see some new claims:
{
  "https://domain.com/roles": [],
  "given_name": "Christopher",
  "family_name": "Kingdon",
  "nickname": "mynickname",
  "name": "Christopher Kingdon",
  "picture": "https://lh3.googleusercontent.com/a-/AOh14Ggs1UxJWCUsIhT_gRzUjELXHanyeijOlWpSC4unAt0=s96-c",
  "locale": "en",
  "updated_at": "2022-04-12T16:14:04.607Z",
  "email": "[email protected]",
  "email_verified": true,
  "iss": "https://domain.us.auth0.com/",
  "sub": "google-oauth2|583617359415889637526",
  "aud": "atnjnqKn4DtcUobadRRW0NegG2o3bTsx",
  "iat": 1649794769,
  "exp": 1649830769
}
You were probably also prompted to authorize our application to access this info. This is part of the beauty of OAuth is that creates a framework that forces users to grant consent for things that an application may do on their behalf.
Now that we’ve got that info, let’s spice up our app a little bit. We’ll start by building a user object to use in the UI. First, install jwt-decode: npm install jwt-decode. Create a new method called getUserInfoFromIdToken:
getUserInfoFromIdToken(idToken) {
  const decodedToken = jwt_decode(idToken)

  return {
    email: decodedToken.email,
    firstName: decodedToken.given_name,
    lastName: decodedToken.family_name
  }
}
JWTs are well defined and we could have decoded them manually if we wanted. This library makes decoding them very simple. One important thing to note about JWTs is that you shoulD NEVER store secret information in them. JWTs are not encrypted. Anyone can see their contents. What they do give you via the signature is the ability to verify that the contents of the JWT have not changed and are what the auth provider gave you.
Now let’s use the function!
import jwt_decode from "jwt-decode"
this.idToken = idToken
this.accessToken = accessToken
this.isAuthenticated = true

this.user = this.getUserInfoFromIdToken(this.idToken)
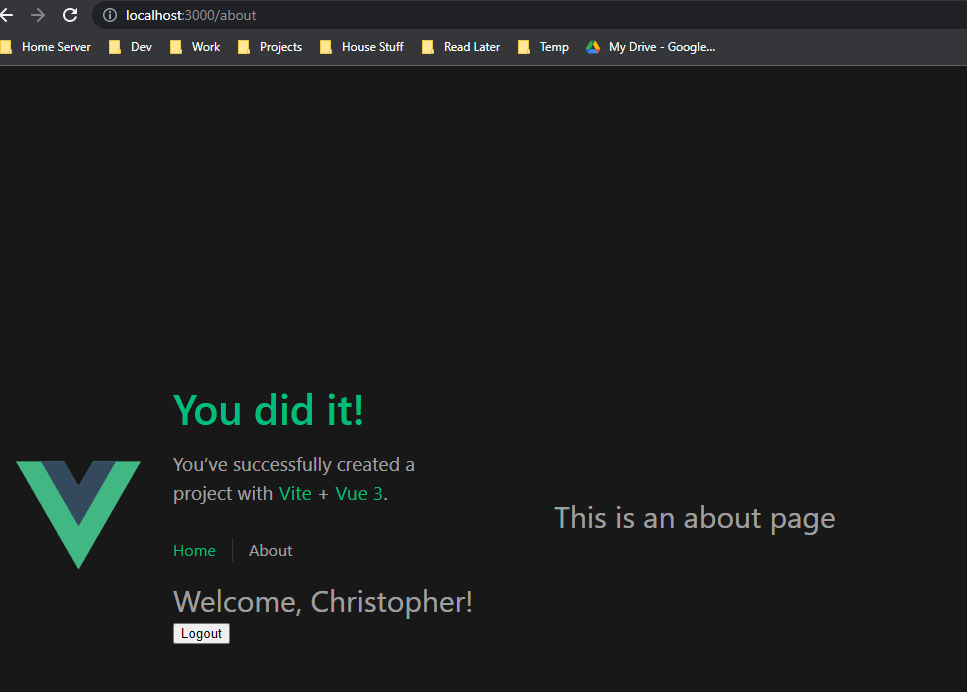
With that set up we can actually use this in the app. Let’s modify our App.vue to only show the login button if we are not authenticated and add a nice welcome message for our user:
<button v-if="!isAuthenticated" type="button" @click="login">Login</button>
<h1 v-if="isAuthenticated">Welcome, {{ user.firstName }}!</h1>
const isAuthenticated = computed(() => {
  return auth.isAuthenticated
})

const user = computed(() => {
  return auth.user
})
We add two new computed variables and then in the HTML we can reference them. Our app should look something like this once we’ve logged in:
While this looks great and all we really need is a way to log out let’s do that next. Add a button and a logout method to App.vue:
<h1 v-if="isAuthenticated">Welcome, {{ user.firstName }}!</h1>
<button v-if="!isAuthenticated" type="button" @click="login">Login</button>
<button v-if="isAuthenticated" type="button" @click="logout">Logout</button>
const logout = async () => {
  await auth.logout()
}
And in the authentication module:
async logout() {
  this.isAuthenticated = false
  this.user = {}

  // As of 4/12/2022 the OIDC spec does not include a logout URL so this will vary by auth provider
  const logoutUrl = new URL(`https://${this.domain}/v2/logout`)
  logoutUrl.searchParams.append('client_id', this.clientId)
  logoutUrl.searchParams.append('return_to', window.location.origin)

  window.location.href = logoutUrl.href
}
One thing to note here is that as of 4/12/2022 the OIDC (OpenId Connect) spec does not specify a logout URL so this will vary by your auth provider. In our case since we are using Auth0, we can use the v2 endpoint document here. Now if we click logout we are redirected to Auth0 for logout and then redirect back to our application. We should see now that our welcome message has gone away and the login button is back.
Step 6: Securing an Individual Page
The last thing I want to go over isn’t specifically related to OAuth or OIDC but it’s a super common thing that you may have to do so I’ll go ahead and go over it. Right now our application is set up such that we can log in but we can still access the entire website if want to. The next step is to secure a page so that it can only be accessed if the user is logged in. For this demo, I’ll secure the about page. If the user tries to go there and they are not logged in then we’ll redirect them to the login screen.
To begin, create a new file under the auth folder called authGuard.js and add the following code:
import { getInstance } from './index'
import { watch } from 'vue'

export const authenticationGuard = (to, from, next) => {
  const auth = getInstance()

  // This is the actual action we will call once the auth module is loaded
  const guardAction = () => {
    if (auth.isAuthenticated) {
      return next()
    }

    auth.login()
  }

  // Wait for the auth module to load before we do anything else
  if (auth.loading) {
    watch(() => auth.loading, (currentValue, oldValue) => {
      if (currentValue === false) {
        guardAction()
      }
    })
  } else {
    guardAction()
  }
}
So what we are doing here is pretty straightforward. We start by getting our auth module instance and then we define the action we want to take. In this case, we will redirect a user to the login screen if they are not authenticated. The last part is dealing with the case where the auth module hasn’t finished loading. We add a Vue watcher to the loading property that will fire the guard action when it’s done. This example could easily be expanded to check different things about the user like the roles claims that we saw on the token if we wanted to protect admin pages etc.
To actually use the auth guard we need to modify the router. Go to the router folder and open index.js there. Modify it as follows:
import { authenticationGuard } from '@/auth/authGuard'
{
  path: '/about',
  name: 'about',
  // route level code-splitting
  // this generates a separate chunk (About.[hash].js) for this route
  // which is lazy-loaded when the route is visited.
  component: () => import('../views/AboutView.vue'),
  beforeEnter: authenticationGuard
}
Making use of the auth guard is very straightforward. All we have to do is add it as a before enter call and that’s it! Now if you click on the about button while you are logged you should get redirected back to the login screen. Now there’s one last issue with this solution. You may have noticed that after logging in you weren’t redirected back to the original screen you were trying to access. Let’s fix that now.
Auth0 requires that we redirect the user back to a specific URL. This means that we can’t just set the redirect URL to get them back to where they left off. In order to accomplish what we want we’ll use another part of the OIDC spec called state. Start by modifying our authentication module again:
async login(options) {
  const codeVerifier = nanoid(64)
  sessionStorage.setItem(codeVerifierName, codeVerifier) // Save the code verifier for when we come back from the login

  const codeChallenge = cryptojs.enc.Base64url.stringify(cryptojs.SHA256(codeVerifier))

  const loginUrl = new URL(this.openidConfig.authorization_endpoint)
  loginUrl.searchParams.append('client_id', this.clientId)
  loginUrl.searchParams.append('redirect_uri', window.location.origin)
  loginUrl.searchParams.append('response_type', 'code')
  loginUrl.searchParams.append('scope', 'openid profile email')
  loginUrl.searchParams.append('code_challenge', codeChallenge)
  loginUrl.searchParams.append('code_challenge_method', 'S256')

  let appState = {}
  if (options && options.appState) {
    appState = options.appState
  }

  const encodedAppState = encodeURIComponent(JSON.stringify(appState))
  loginUrl.searchParams.append('state', encodedAppState)

  window.location.href = loginUrl.href
}
We start by modifying the login method to accept a new parameter called options which will contain the apostate property. Next, we stringify the appsate and set it as the state param for our auth call. Next we’ll import the router and modify our init method to push to path that will get saved into apppsate:
import router from '@/router'
async init() {
  // Get the openid configuration details
  const configResponse = await axios.get(`https://${this.domain}/.well-known/openid-configuration`)
  this.openidConfig = configResponse.data

  const urlParams = new URLSearchParams(window.location.search)
  if (urlParams.has('code') && urlParams.has('state')) {
    const code = urlParams.get('code')
    const state = JSON.parse(decodeURIComponent(urlParams.get('state')))

    const tokenRequestOptions = {
      method: 'POST',
      url: this.openidConfig.token_endpoint,
      headers: { 'content-type': 'application/json'},
      data: {
        grant_type: 'authorization_code',
        client_id: this.clientId,
        code_verifier: sessionStorage.getItem(codeVerifierName),
        code,
        redirect_uri: window.location.origin
      }
    }
    const tokenResponse = await axios.request(tokenRequestOptions)
    const idToken = tokenResponse.data.id_token
    const accessToken = tokenResponse.data.access_token

    this.idToken = idToken
    this.accessToken = accessToken
    this.isAuthenticated = true

    this.user = this.getUserInfoFromIdToken(this.idToken)

    router.push(state.targetUrl
      ? state.targetUrl
      : window.location.pathname)
  }

  this.loading = false
}
The final piece is to modify our authGuard to pass in the path as a parameter when it calls login:
const guardAction = () => {
  if (auth.isAuthenticated) {
    return next()
  }

  auth.login({ appState: { targetUrl: to.fullPath } })
}
Now if we navigate to the about page without logging in it should drop us back at the about page!
Final Thoughts
So today we looked at how to get a basic authentication scenario up and running on the client-side. Hopefully, this helps you get off the ground quickly and have a better understanding of how the auth flow works. In my next post, I’ll go over how to integrate all of this together with a backend so be sure to check back! In addition, while this post focused on doing it from scratch, many providers offer their own libraries for this stuff which can greatly simplify the process. I’ll also include an example in this repo that uses Auth0’s library and show just how simple it can be. As always if you have any questions or comments feel free to ask down in the comments!
