I’ve been using Auth0 as my login provider for several projects recently. Overall I really like their offering and you should definitely give it a try if you haven’t already (They have an excellent free tier for you to try stuff out). One area I have found that they lack in, however, is ci/cd. In today’s post, I’ll go over the basics of setting up a ci/cd pipeline for Auth0. As always you can find my example code at my GitHub here.
Step 0: Prepare Auth0
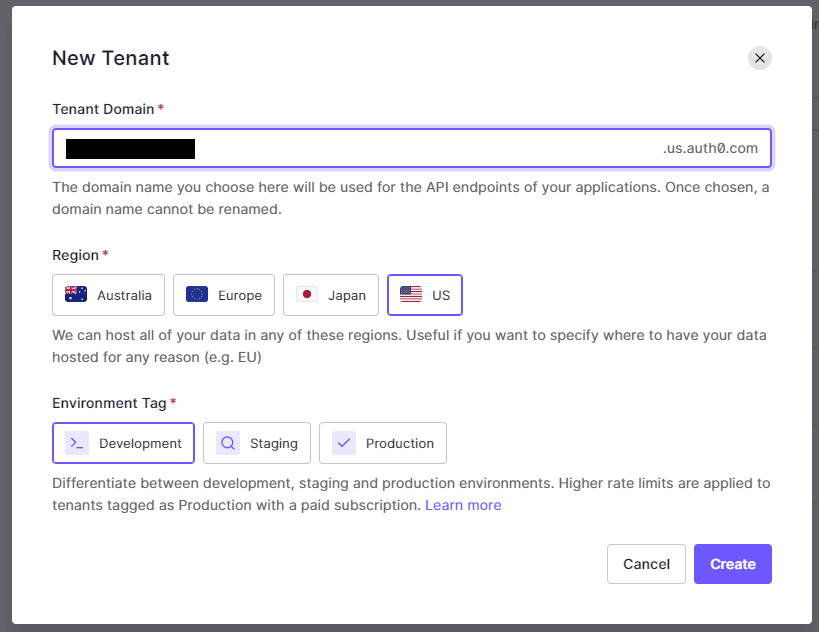
Before we can begin code we must first do some initial setup of Auth0. To start, go to Auth0.com and log in or sign up for an account. From there we’ll create a new tenant. Give it a unique name, select the region that best meets your needs, and select development for the environment tag:
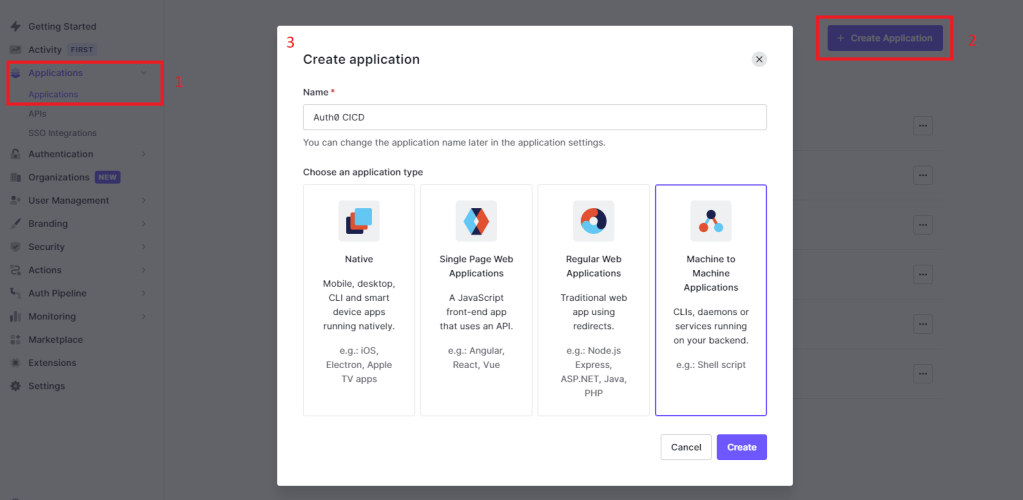
Now that we’ve got our tenant created we need to create a new application which we will use to authenticate our scripts so that we can use the Auth0 deploy tool. The process for creating this application is well documented by Auth0 here but I’ll quickly go over the basics here as well.
First, create a machine-to-machine application and call it Auth0 CICD. When asked which API to connect it to select the Auth0 Management API:
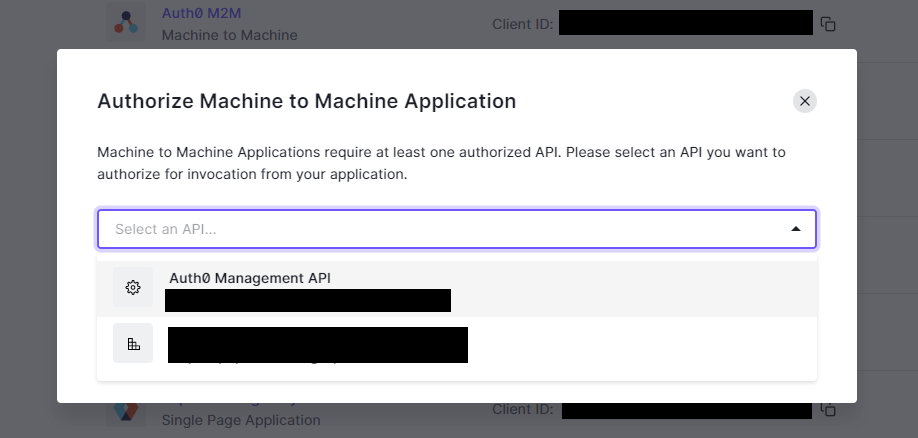
Finally, we need to assign all of the scopes required for the deploy tool to work. Here are the scopes we will need for this tutorial:
- read:client_grants
- create:client_grants
- delete:client_grants
- update:client_grants
- read:clients
- update:clients
- delete:clients
- create:clients
- read:client_keys
- update:client_keys
- delete:client_keys
- create:client_keys
- read:connections
- update:connections
- delete:connections
- create:connections
- read:resource_servers
- update:resource_servers
- delete:resource_servers
- create:resource_servers
- read:rules
- update:rules
- delete:rules
- create:rules
- read:rules_configs
- update:rules_configs
- delete:rules_configs
- read:hooks
- update:hooks
- delete:hooks
- create:hooks
- read:actions
- update:actions
- delete:actions
- create:actions
- read:email_provider
- update:email_provider
- delete:email_provider
- create:email_provider
- read:tenant_settings
- update:tenant_settings
- read:grants
- delete:grants
- read:guardian_factors
- update:guardian_factors
- read:email_templates
- create:email_templates
- update:email_templates
- read:mfa_policies
- update:mfa_policies
- read:roles
- create:roles
- delete:roles
- update:roles
- read:prompts
- update:prompts
- read:branding
- update:branding
- read:organizations
- update:organizations
- create:organizations
- delete:organizations
Now that we’ve got our initial setup out of the way let’s move on to the actual pipeline.
Step 1: Dumping the Existing Config
First things first, to create and modify things we first need to pull down what we have. To start let’s initialize a new npm project by running the command npm init in an empty folder. Install the following libraries using npm install: auth0-deploy-cli, dotenv, and axios. Finally, add a new command to your package.json called dump which will use node to run a simple javascript file (Note: If you have not installed node please do so at this time):
"scripts": {
    "dump": "node dump.js"
  }
Now create a new file called dump.js and add the following content:
require('dotenv').config()

const auth0Cli = require('auth0-deploy-cli')
const config = require('./config/tenantName-dev.json')

// Create the name for our dump
const today = new Date()
var date = `${today.getFullYear()}-${(today.getMonth() + 1)}-${today.getDate()}`
var time = `${today.getHours()}-${today.getMinutes()}-${today.getSeconds()}`
const datetime = `${date}_${time}`

// Retrieve Auth0 Configuration
auth0Cli.dump({
    output_folder: `dump/${datetime}`,
    config: config
})
    .then(() => console.log('Auth0 config dumped successfully!'))
    .catch(err => console.log(`An error occured while attempting to dump Auth0 config: ${err}`))
The code is fairly straightforward. We start by calling config() on the dotenv library. This will populate the required environment variables we’ll need to talk to Auth0. Next, we pull in the Auth0 library and the Auth0 tenant config file (we’ll go over this in more detail later). Then, we create a string that will be the name of our dump directory (I like to use datetime to make it easy to see what my latest dump was). Finally, we call the Auth0 dump() method which will pull down the current config and dump it into a new directory.
Before we can run the dump command we first need to add two new files. The first will be a file in the config folder called tenantName-dev.json (where tenantName is your tenant name). Add the following json:
{
    "AUTH0_DOMAIN": "tenantName.us.auth0.com",
    "AUTH0_EXPORT_IDENTIFIERS": false,
    "AUTH0_KEYWORD_REPLACE_MAPPINGS": {
        "AUTH0_TENANT_NAME": "tenantName"
    },
    "AUTH0_ALLOW_DELETE": true,
    "AUTH0_EXCLUDED_CLIENTS": [
        "auth0-deploy-cli-extension"
    ],
    "EXCLUDED_PROPS": {
        "clients": [
            "client_secret"
        ],
        "connections": [
            "options.client_secret"
        ]
    }
}
AUTH0_EXPORT_IDENTIFIERS, tells auth0 to export resource ids in the dump. This can be helpful in scenarios where you want to make sure that you are always updating the same resource in Auth0. While it sounds like a nice feature it also means you have to be careful not to include the id when creating any new resources and then adding it back in after the resource has been created which can be quite troublesome. If you decided to leave it has false you should be aware that it will use the resource name to update stuff instead and will create a new resource if the name changes.
The second setting, AUTH0_ALLOW_DELETE, tells auth0 to either delete any resources not defined in the config when we deploy or to do an incremental update. It’s really up to you which behavior you want just know that if you do incremental updates you will be responsible for cleaning up leftover resources and conversely if you do delete mode then any changes in auth0 will be wiped out and replaced with the config.
Finally, just one small note on the excluded settings. These settings allow you to exclude certain resources from being updated at all when we deploy. This is important for certain applications such as the auth0 deploy application which is what we use for ci/cd. If something changed on that application it could break our whole pipeline so we exclude it here.
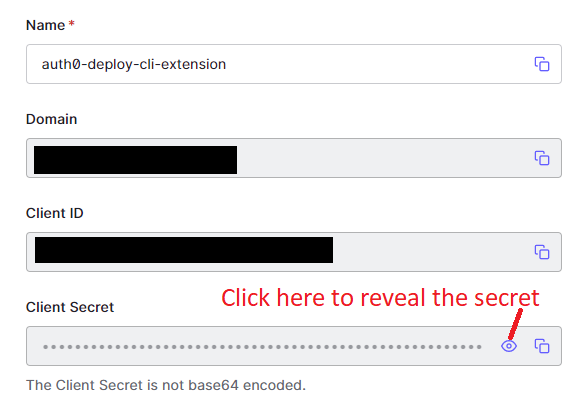
The next file we will create is our .env file. This will define some environment secrets we need to run the command:
AUTH0_CLIENT_ID=<Auth0 CICD application ID>
AUTH0_CLIENT_SECRET=<Auth0 CICD application Secret>
You can find the values for these settings in Auth0 by going to the application you created earlier:

Now we are finally ready to run our dump command! In a terminal run the following command: npm run dump. You should get an output that looks something like this:
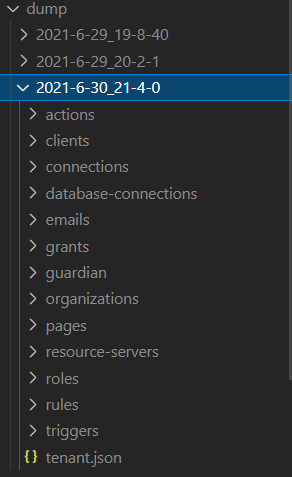
Each folder will contain a json file that has the settings for that particular resource. Also at the bottom, you will notice there is a tenant.json file that contains tenant-wide settings. Next, we’ll look at how to deploy our config.
Step 2: Deploy the Config
Now that we have our config dumped let’s go ahead and deploy it back to Auth0. To begin create a new command in the package.json file called deploy and give it the following command: node deploy.js. Now create a new file called deploy.js with the following code:
require('dotenv').config()

const auth0Cli = require('auth0-deploy-cli')
const config = require('./config/tenantName-dev.json')

auth0Cli.deploy({
    input_file: 'tenantName-dev',
    config: config
})
    .then(() => console.log('Auth0 config deployed successfully!'))
    .catch(err => {
        console.error(`An error occured while attempting to update Auth0 config: ${err}`)
        process.exit(1)
    })
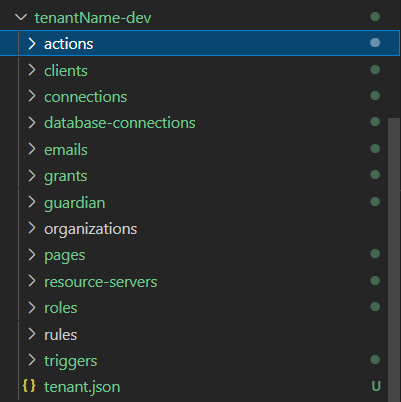
This code is even simpler than our dump.js. For this, we simply pull in our required libraries and call the deploy command. The most important part of this code is the input_file parameter. This tells the Auth0 deploy library where to find our config to deploy. In this case, it’s in the tenantName-dev folder. To use our deploy command create a new folder called tenantName-dev and copy every file/folder from the most recent dump into that folder like so:
Make any small changes you like so that you can see the difference and then run npm run deploy. If everything has worked as expected your Auth0 config should be updated!
Step 3: Get Branding
While this approach works great for most scenarios it runs out there are several things that cannot be dumped/deployed via the Auth0Cli tool. The main thing being branding and verbiage for the universal login (There is an HTML file you can edit if you are using the classic login). To solve this we can use the Auth Management API. We’ll start by modifying our dump script.
Start by adding the following lines of code after creating our date string:
const fs = require('fs')
const templateDirectory = `./dump/${datetime}/universal-login`
if (!fs.existsSync(templateDirectory)) {
    fs.mkdirSync(templateDirectory, { recursive: true })
}
This will tell our script to create a new folder to store our universal login stuff. Next, we need to add some async functions that will help us out. The first is the getToken() function which will take a parameter called domain:
const axios = require('axios')
async function getToken(domain) {
    const options = {
        method: 'POST',
        url: `https://${domain}/oauth/token`,
        headers: {'content-type': 'application/json'},
        data: {
            grant_type: 'client_credentials',
            client_id: process.env.AUTH0_CLIENT_ID,
            client_secret: process.env.AUTH0_CLIENT_SECRET,
            audience: `https://${domain}/api/v2/`
        }
    }

    const response = await axios.request(options)

    return response.data.access_token
}
This function grabs our environment secrets and uses them to get an Auth0 management API token that we can use for later calls. Now we’ll add another function that uses the token:
async function dumpLoginTemplate(domain, token) {
    console.log('Dumping universal login templates...')
    let options = {
        method: 'GET',
        url: `https://${domain}/api/v2/branding/templates/universal-login`,
        headers: {
            authorization: `Bearer ${token}`
        }
    }

    try {
        let response = await axios.request(options)

        fs.writeFileSync(`${templateDirectory}/login.html`, response.data.body)
        console.log('Universal login temaplates dumped successfully!')

    } catch (e) {
        console.error(e)
    }
}
This function calls the management API using the token we got before for authentication and pulls down the universal login template fluid file. Finally, to put it all together we add the following function and function call above getToken:
dumpBranding().then().catch()
async function dumpBranding() {
    const domain = 'tenantName.us.auth0.com'
    const token = await getToken(domain)

    await dumpLoginTemplate(domain, token)
}
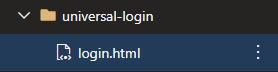
The first line calls the async function and then all the actual function does is get a new token and pass it to the dumpLoginTemplate function. Now if we run our dump command we should see a new folder called universal login with a new file called login.html:
Step 4: Deploy Branding
Now that we have our branding deploying it is the same process but in reverse. Add the following code to the end of our deploy.js file:
const axios = require("axios")
deployBranding().then().catch()

async function deployBranding() {
    const domain = 'tenantName.us.auth0.com'
    const token = await getToken(domain)

    await deployLoginTemplate(domain, token)
}

async function getToken(domain) {
    const options = {
        method: 'POST',
        url: `https://${domain}/oauth/token`,
        headers: {'content-type': 'application/json'},
        data: {
            grant_type: 'client_credentials',
            client_id: process.env.AUTH0_CLIENT_ID,
            client_secret: process.env.AUTH0_CLIENT_SECRET,
            audience: `https://${domain}/api/v2/`
        }
    }

    const response = await axios.request(options)

    return response.data.access_token
}

async function deployLoginTemplate(domain, token) {
    console.log('Updating universal login template...')
    const data = fs.readFileSync('./tenantName-dev/universal-login/login.html', 'utf8')

    const options = {
        method: 'PUT',
        url: `https://${domain}/api/v2/branding/templates/universal-login`,
        headers: {
            authorization: `Bearer ${token}`,
            'content-type': 'text/html'
        },
        data: data
    }

    try {
        await axios.request(options)
        console.log('Universal login update complete!')
    } catch (e) {
        console.error(e)
    }
}
This code is very similar to our dump code. We start by getting a management API token and then use it to deploy our file. That’s it, that’s all there is to it! The universal login template is just one example. Several other things can only be updated via this method such as the custom text used on the login screens which can be updated via api/v2/prompts. For a full list of management API routes, you can look here.
Final Thoughts
As you can see once you know how to do it it’s not that complicated to fill the CI/CD holes in the Auth0CLI deploy tool. Having reliable CI/CD and being able to define all of your settings in code is essential to any modern web application. Being able to have it all in one place makes things a lot easier to manage. In fact, as of writing this the universal login template and its associated verbiage can’t even be updated through the UI making a tool like this absolutely necessary.
I hope that this was helpful and that you can use it to accelerate your projects. As always if you have any questions or if I missed something feel free to let me know down in the comments. Happy coding!

One thought on “ CI/CD With Auth0 ”