Anyone who has spent some time with ARM (Azure Resource Manager) templates can tell you how complex and painful writing and maintaining them can be. To help with this Microsoft has created a new language called Bicep. Bicep allows us to write ARM templates in a much cleaner and easy-to-read syntax. It simplifies the process of writing infrastructure as code and allows much easier reuse of our infra code. The Bicep language transpiles directly to a JSON ARM template so the functionality is 1-to-1 in almost all cases. (As of writing this Bicep is still in preview and there are few known limitations).
In today’s post, I will go over how to get started with bicep, build some commonly used resources, and some common pitfalls of Bicep. Without any further discussion then let’s start flexing!
Step 1: Setup Your Environment
The only thing required to write and deploy bicep is either the Azure CLI (v2.20 or later) or Azure Powershell (v5.6 or later). Technically, if you are using this via a CI/CD environment, you wouldn’t even need that, but I’ll be using Azure CLI for this tutorial. If you don’t already have you can find instructions to install it here.
While also not required, I highly recommend installing both the vscode extension for Bicep found here and the bicep CLI found here. This will make our lives a lot easier when writing and debugging Bicep.
The final thing you will need of course is an Azure subscription. You can get one for free or use an existing one.
Step 2: Bicep Basics
At its core Bicep aims to be a 1-for-1 replacement for ARM. To begin we’ll start with the simplest example to create a resource group.
First, create a new file called main.bicep and add the following code:
targetScope = 'subscription'

resource rg 'Microsoft.Resources/resourceGroups@2021-01-01' = {
  name: 'rg-bicep101-ckingdon'
  location: 'eastus2'
  tags: {
    aCoolTag: 'CoolTagValue'
  }
}
The first line tells bicep that we are adding resources at the subscription level. Most other resources we create will be scoped to the resource group they will belong to but the resource group is a special case.
Next, we define the actual resource we want to create. We start with the keyword resource followed by a user-friendly name. Note: You may be tempted to call your resource group “resourceGroup” however that will cause problems as resourceGroup() is a built-in method in Bicep/ARM.
The next segment should look very familiar if you have used ARM before. We give the actual type of resource we are wanting to create and then the API version we will use to define it.
Lines 4-8 define all of the properties that this resource type has. Now that we have a very basic resource defined let’s see it in action!
Step 3: Verify and Deploy
Run the command: az bicep build --file main.bicep (Note: If you didn’t install bicep via the Azure CLI simply run bicep build ...)
You should now have a file called main.json with the following contents:
{
  "$schema": "https://schema.management.azure.com/schemas/2018-05-01/subscriptionDeploymentTemplate.json#",
  "contentVersion": "1.0.0.0",
  "metadata": {
    "_generator": {
      "name": "bicep",
      "version": "0.4.1.14562",
      "templateHash": "11179835542424074903"
    }
  },
  "functions": [],
  "resources": [
    {
      "type": "Microsoft.Resources/resourceGroups",
      "apiVersion": "2021-01-01",
      "name": "rg-bicep101-ckingdon",
      "location": "eastus2",
      "tags": {
        "aCoolTag": "CoolTagValue"
      }
    }
  ]
}
The top section is all related to the actual deployment but if you look at the resources section you will see the ARM version of the bicep we wrote. Notice how everything maps to the actual ARM template.
Now that we’ve seen what it will generate let’s try and deploy it! Deploying Bicep is simpler than ever. Start by logging in to azure via az login
Now run the following command to deploy it:
az deployment sub create --subscription <YourSubscriptionIdHere> --location eastus2 --template-file main.bicep
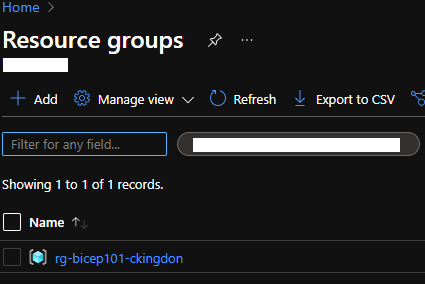
If everything worked correctly you should see some output in your terminal. If you now navigate to the Azure Portal you should now see our new resource group under your selected subscription:
Step 4: Modules
Probably one of the most powerful things in bicep are modules. Modules allow you to easily build groups of resources and create reusable code. To demonstrate this we will create a new file called storageaccount.bicep. We’ll start by defining the resource the same as we did with the resource group in step 2:
resource storageAccount 'Microsoft.Storage/storageAccounts@2021-02-01' = {
  name: 'stbicep101'
  location: 'eastus2'
  tags: {}
  kind: 'StorageV2'
  sku: {
    name: 'Standard_LRS'
    tier: 'Standard'
  }
  properties: {
    accessTier: 'Hot'
    networkAcls: {
      bypass: 'AzureServices'
      defaultAction: 'Allow'
    }
  }
}
Now let’s clean this up a bit. Since we want this to be a reusable module we’ll start by making the name dynamic. To do this add a new line at the top of the file like so:
param projectName string = 'defaultName'
This tells bicep that this module takes in an optional parameter called projectName which is a string and has a default value of ‘defaultName’. Next, to use it we’ll modify the name:
name: 'st${projectName}'
The dollar sign bracket notation can be used in strings to do string interpolation. Here we are saying that the name will be ‘st’ followed by the parameter projectName. Before we go any further you may notice a problem. The projectName param has a default value that contains a capital letter. Since storage accounts don’t support special characters or capital letters we need a way to fix this. We can do this by using a built-in function called toLower():
name: 'st${toLower(projectName)}'
This doesn’t solve everything but it shows some of the ways you can manipulate parameters. You can find a full list of all available functions here. You may notice that the page shows ARM functions. That’s because as mentioned previously bicep is 1-to-1. Most if not all ARM functions are either the same or have another equivalent in bicep.
Another thing we can do to simplify things is for the location and tags properties. We can use the resourceGroup() method to get an object containing some common properties.
location: resourceGroup().location
tags: resourceGroup().tags
Now that we have our new storageaccount module lets get to using it! In our main.bicep file add the following code:
module storage 'storageaccount.bicep' = {
  name: 'storageaccount'
  scope: resourceGroup(rg.name)
  params: {
    projectName: 'bicep101'
  }
}
We start by using a new keyword “module”. This specifies we are declaring a module instead of an individual resource. We then give it a name and the location of the module file similar to how we declare a resource. After we’ve done that we give the actual module deployment a name then we define the scope that it will be deployed in. In this case, since we are deploying to a resource group we must specify the scope to be the resourceGroup we defined earlier. Finally, we specify the parameters that were defined in the module earlier.
Great now let’s see if it works! Rerun the deployment command: az deployment sub create --subscription <YourSubscriptionIdHere> --location eastus2 --template-file main.bicep
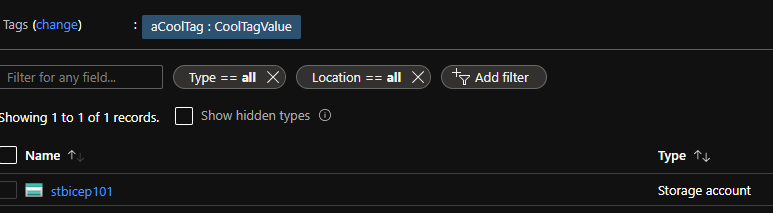
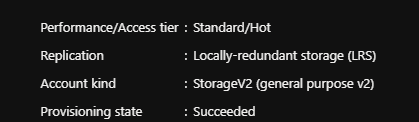
Drilling in we can see our new storage account and then verify that our settings were applied correctly:
Common Examples:
Now that we’ve gone over some of the basics I want to go through a handful of common examples that may help you get started with bicep quicker!
Variables
Besides parameters, you can also specify variables in your bicep files. For example, say we wanted to use the storage account name from our previous example in several places within that module. We could have defined the name like this:
var storageAccountName = 'st${toLower(projectName)}'

resource storageAccount 'Microsoft.Storage/storageAccounts@2021-02-01' = {
  name: storageAccountName
  ...
}
Parameter Types
Besides strings, there are several other types we can use as parameters to modules. The most obvious ones are bool and int but we can also pass in arrays or even whole objects like so:
// module.bicep
param testObject object
param testArray array

// main.bicep
module test 'module.bicep' = {
  ...
  params: {
    testObject: {
      someProperty: 'test'
    }
    testArray: [
      'arrayTest'
    ]
  }
}
You can also secure objects/strings so that they won’t show up in deployment history/logging by specifying @secure() above the parameter like this:
@secure()
param testString string
Outputs
Sometimes you will need values from one module to be available later in the Bicep. To accomplish this you can use outputs. In our storage account example, the storage account creates an access key which we need to create a connection string later. To do this add the following to the end of your storageaccount.bicep file.
output key string = listKeys(storageAccount.id, '2021-01-01').keys[0].value
This tells the module to output the string variable key which is defined by the listKeys template function. To consume the output see this example in our main.bicep:
var outputExample = storage.outputs.key
Parameter Files
Just like ARM templates Bicep supports parameter files/parameters being passed in via the command line. To use them simply create a new file such as prod.parameters.json and then when you go to deploy your Bicep add the --parameters 'prod.parameters.json' flag to your deploy command and they will get passed into your main.bicep file if you have defined parameters there.
Keyvault Reference
Often times you need to reference a secret stored in keyvault. To do this you can use the following syntax:
resource keyvault 'Microsoft.KeyVault/vaults@2021-04-01-preview' existing = {
  name: 'some-keyvault-name'
  scope: resourceGroup(rg.name)
}

module app 'app.bicep' = {
  name: 'demo'
  scope: resourceGroup(rg.name)
  params: {
    secret: keyvault.getSecret('secretName')
  }
}
We start by getting a reference to an existing keyvault (you can omit the existing part if you are creating the keyvault here). Then we called the keyvault function getSecret() to pass in the secret to our app module.
Note: This method requires Bicep version 0.4.
Common Pitfalls:
Over time working with Bicep I’ve come across various issues that can sometimes be difficult to diagnose. This final section will focus on some of the common pitfalls you may run into as your work with Bicep.
Overriding built-in template functions
As mentioned earlier with the resourceGroup function you have to be careful not to use a variable/parameter name that conflicts with a built-in template function. You can find a list of available template functions here.
Conditionally creating resources
Bicep allows you to conditionally create a resource using this syntax: resource rg 'Microsoft.Resources/resourceGroups@2021-01-01' = if (condition) { ... } This can make for some very flexible templates. That being said you will run into an error if another module/resource used an output from this resource/module even if you conditionally create to the 2nd resource/module as well. For example, if the condition is false the following bicep will fail:
resource rg 'Microsoft.Resources/resourceGroups@2021-01-01' = if (condition) {
 ...
}

resource rg2 'Microsoft.Resources/resourceGroups@2021-01-01' = if (condition) {
  params: {
    test: rg.outputs.name
  }
}
Final Thoughts
Bicep is an awesome tool and there’s a ton of really cool new features coming in the near future. If you haven’t checked it out already I encourage you to give it a try. It’s not perfect but I think it’s probably one of the best ways to do infrastructure as code to date. As always let me know if you have questions or comments down below!

One thought on “ A Quick Intro to Bicep ”