This past week I was building a very simple python function app for one of my projects. The application was simple enough. It was triggered via a timer and deletes old releases of another application from an azure storage account. Unfortunatly what should have been a quick couple hour project turned into a multi-day grind of just trying things until they worked.
This multi-part guide is the result of that and I hope that it can help someone else get through it much quicker. For part one we will focus on getting a very basic function app up and running locally and then deploy it to auzre.
Step 1: Project Setup
First things first if you have never done anything with azure functions before we need to install some required software. Namely Azure Function Core Tools, the Azure CLI (make sure you have the latest version or some commands may not work) and of course python version 3.8. I would also highly recomend downloading VSCode and installing the Azure Functions extensions. This isn’t technically nessiary but as you’ll see it makes starting out a lot easier and I will show how to create a function using this extension. If you don’t want to use VSCode you will just have to create the file and folder structure manually.
Note: Before going any further I should mention that I was not able to get the python function app working locally using anaconda virtual environments. So if you are following this guide make sure you install python 3.8 manually outside of anaconda.
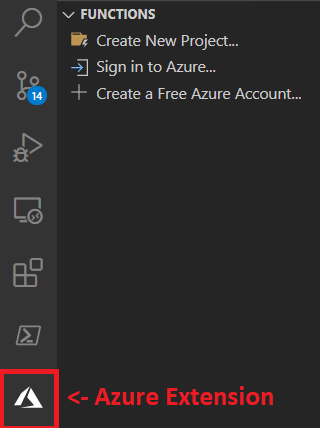
Start by creating a new folder where will store our code. Then open the folder in vscode and click on the azure extension. Next click on Create New Project.
This will take you through a series of steps to create the project.
First pick a location so generate the project files:

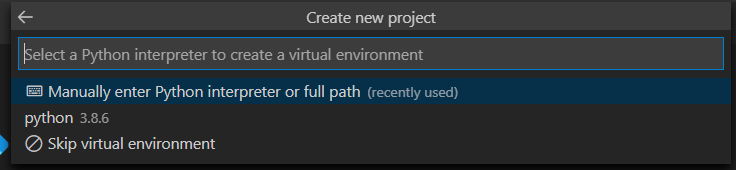
Next select the python interpreter to use. Make sure that you select python 3.8.x. 3.6 & 3.7 are also supported. If you need to use one of those you will need to ensure that you are using it everywhere else as well.
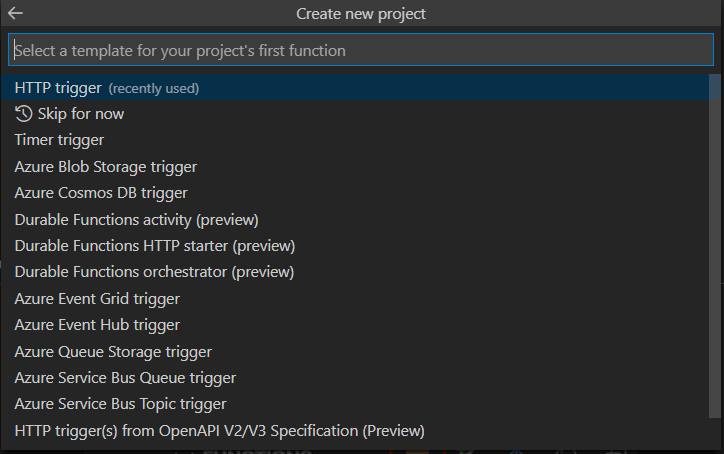
Next select the trigger, for this function we will select HTTP Trigger:
Next give your function a name:

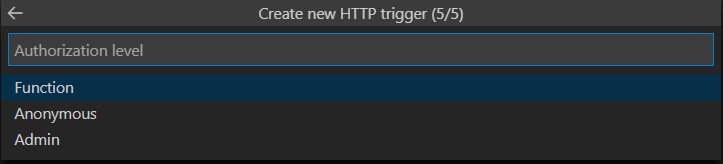
Finally, you must select the authorization level. For this function we will choose anonymous but depending on your needs you may need to select function or even admin. (More on that later)
VSCode will now generate the files and if you have done everything right so far you should have a file structure that looks like this:
src/
 ├── .venv/
 ├── HelloWorld/
 │   ├── __init__.py
 │   ├── function.json
 │   └── sample.dat
 ├── .funcignore
 ├── .gitignore
 ├── host.json
 ├── local.settings.json
 ├── proxies.json
 └── requirements.txt
Step 2: Playing Around & Local Debugging
Before diving into what all of these files do open up powershell and navigate to the src directory. Run the command: func start
The function app should start and if you open a browser and go to http://localhost:7071/api/HelloWorld?name=chris we should be greeted this this message:
Hello, chris. This HTTP triggered function executed successfully.
Awesome! Now lets dig into the code. We’ll start with __init__.py
import logging

import azure.functions as func

def main(req: func.HttpRequest) -> func.HttpResponse:
  # logging calls can be picked up by application insights
  logging.info('Python HTTP trigger function processed a request.')

  name = req.params.get('name')
  if not name:
    try:
      req_body = req.get_json()
    except ValueError:
      pass
    else:
      name = req_body.get('name')

  if name:
    return func.HttpResponse(f"Hello, {name}. This HTTP triggered function executed successfully.")
  else:
    return func.HttpResponse(
      "This HTTP triggered function executed successfully. Pass a name in the query string or in the request body for a personalized response.",
      status_code=200
    )
This code should seem somewhat familiar to anyone who has messed with a typical API before. We get a request, do some stuff, and then return a response. The cool thing is we get this without having to deal with any of the overhead typically associated with creating a API and setting up routing etc. Where things get more interesting is if we take a look at function.json:
{
  "scriptFile": "__init__.py",
  "bindings": [
    {
      "authLevel": "anonymous",
      "type": "httpTrigger",
      "direction": "in",
      "name": "req",
      "methods": [
        "get",
        "post"
      ]
    },
    {
      "type": "http",
      "direction": "out",
      "name": "$return"
    }
  ]
}
You’ll notice we have two bindings here. The first is the function trigger. Every function will at the very least have a trigger input binding. We can see that this trigger is what gets us our request and it accepts either GET or POST requests. The second binding is an output. We can have multipel outputs but only one output can be bound to the return method. In this case we have bound at http response to return. Bindings are where function apps really come alive. Lets play around a bit.
Lets start by adding a new output binding that will save our name along with a randomly generated guid into blob storage. To add the new output binding simply add the following after the return output binding:
{
  "name": "outputblob",
  "type": "blob",
  "path": "users/{rand-guid}",
  "connection": "AzureWebJobsStorage",
  "direction": "out"
}
This block will give us a variable in the function that we can use to write to a blob saved in users and the name of the file will be a randomly generated guid. Now for the code to consume it. First we add a new variable to our function inputs:
def main(req, outputblob) -> func.HttpResponse:
Next we create some next to put into the blob and then call the “set” method to create it:
if name:
    # Create blob to be used by all tests
    text_bytes = name.encode('utf-8')
    new_blob = func.blob.InputStream(data=text_bytes)

    outputblob.set(new_blob)

    return func.HttpResponse(f"Blob for user {name} created successfully.")
If we run the function now we should get a message back that the blob was created successfully. But how do we know that it actually worked? Well to test it lets create a new function that will use a blob trigger.
Note: If for some reason when you run the function you get an error like this: Microsoft.WindowsAzure.Storage: No connection could be made because the target machine actively refused it. Make sure that the azure storage emulator is running and try again.
For our new function create a new folder under src called BlobTrigger and then create two files: __init__.py and function.json just like last time. Folder structure should now look something like this:
src/
 ├── BlobTrigger/
 │   ├── __init__.py
 │   └── function.json
 ├── HelloWorld/
 │   └── ...
 └── ...
Function.json:
{
  "scriptFile": "__init__.py",
  "bindings": [
    {
      "type": "blobTrigger",
      "direction": "in",
      "name": "newBlob",
      "path": "users/{name}",
      "connection": "AzureWebJobsStorage"
    }
  ]
}
__init__.py:
import logging
import azure.functions as func

def main(newBlob: func.InputStream):
  print(f'New blob created with name: {newBlob.name}')

  contents = newBlob.read().decode('utf-8')

  print(f'Blob contents: {contents}')
So now we have a new function that will get triggered when a new blob is created in the users path. The function takes the blob and then prints out the blobs name (which will be users/SomeGuide) and then prints the contents of the blob (in this case the name we sent in from the http function).
So now if we run the function again using func start and then hitting the http trigger we should see the following output in the console (Notice the two highlighted lines are our expected output):
[2020-11-24T17:21:55.983Z] Executing 'Functions.BlobTrigger' (Reason='New blob detected: users/307504ad-5351-4d02-bbc0-59ca2c566689', Id=8fa2cf63-4b33-4e47-b819-a3ff465b27dc)
[2020-11-24T17:21:55.984Z] Trigger Details: MessageId: 28321e7b-a4bc-4848-8e32-51303a65eb3d, DequeueCount: 1, InsertionTime: 2020-11-24T17:21:55.000+00:00, BlobCreated: 2020-11-24T17:21:54.000+00:00, BlobLastModified: 2020-11-24T17:21:54.000+00:00
[2020-11-24T17:21:56.002Z] New blob created with name: users/307504ad-5351-4d02-bbc0-59ca2c566689
[2020-11-24T17:21:56.004Z] Executed 'Functions.BlobTrigger' (Succeeded, Id=8fa2cf63-4b33-4e47-b819-a3ff465b27dc, Duration=131ms)
[2020-11-24T17:21:56.009Z] Blob contents: Chris
Step 3: Deploying to Azure
The final thing we want to do is actually get our application deployed! Before we can deploy it though we need to create some basic infrastructure that is required to create a funciton app in Azure.
To start open up a terminal and type the command az login. This will launch a browser window where you will login to azure. If you do not have an account yet go ahead and create one now and try again. When you have logged in you should see some subscription info listed in the command window. You will need this later.
The next step is to create our resource group that we will use to house the different parts of the app. To create a new resource group use the following command:
az group create --name chrisDemoResourceGroup --location eastus
Replace “chrisDemoResourceGroup” with the name that you want to call your new resource group.
Next we need to create a new storage account. This will be used for storing our blobs but is also a requirement to using a function app in general. To create one use this command:
az storage account create --name chrisdemostorage --location eastus --resource-group chrisDemoResourceGroup --sku Standard_LRS
Finally we can create the actual function app using this command:
az functionapp create --name chrisDemoFunctionApp --storage-account chrisdemostorage --consumption-plan-location eastus --resource-group chrisDemoResourceGroup --os-type Linux --runtime python --runtime-version 3.8 --functions-version 3
Note: It’s important that you choose Linux as the os type as python function apps are not supported on windows at this time.
To verify that everything has been created correctly navigate to portal.azure.com and search for resource groups in the search bar and the click on it.

Next click on the resource group that you just created.

If everything worked correctly you should see four resourced that have been created including the function app, application insights (this may or may not be there for you), a storage account, and an app service plan.

Once you have verified that everything is in place we can finally deploy our app! Open up vscode and navigate to the azure function extension area again as shown at the start. Then this time instead of clicking create new project click sign in to azure. Once you are signed in you should now see all of your subscriptions. To being deployment click on the deploy function app button at the top.

Select the subscription that contains your function app. (You probably only have one but if you don’t you can find which subscription you created everything in the Azure portal)

Now select the function app that we created earlier:
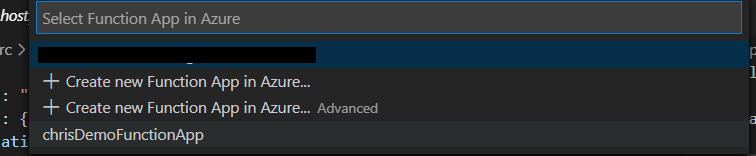
Once the deployment has completed (you can monitor it’s progress by clicking on the output button while it’s deploying). You can now hit your function app in Azure by going going to https://chrisdemofunctionapp.azurewebsites.net/api/HelloWorld where “chrisdemofunctionapp” is the name of your function app.
To verify everything is working as should be we could use application insights however it takes some time for logs to propegate out so instead lets go back to the Azure portal (portal.azure.com) and navigate back to our resource group. This time click on the storage account.

Now go to storage explorer, blob containers, and then users.
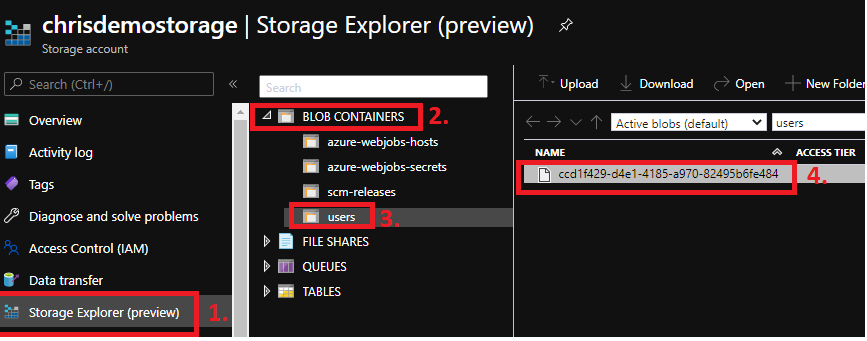
From here you can click on the blob, download it, and verify the contents in your favorite text editor. And that’s it! You now have a fully funcitonal (pun intended) function app written in python!
Final Thoughts
So as you can see writing function apps in python isn’t that bad after all. Python is a super flexible language and I think it fits really well into the azure function ecosystem so you should definitely give them a try. In part two I’ll go over how to complete the process for a more production ready environment with unit tests and devops so stay tuned for my next post! Below I’ve included some resources that you can use to do some further research/see where I got much of my information from.
As always I would love to hear your thoughts on this. So let me know in the comments down below!

Insightful, well-written article!
LikeLiked by 1 person